Data Handling
The QMENTA Platform supports a variety of medical imaging data formats (as well as other data types) and they can be uploaded in an efficient, structured and compliant manner. The process of uploading files always implies the execution of the Medical Image Data analysis. This analysis de-identify the provided data and extracts extensive sets of metadata from the uploaded files to facilitate their classification. Overall, the Medical Image Data analysis makes the data management process within the QMENTA Platform as seamless as possible.
Upon execution of the Medical Image Data analysis, all the uploaded data is available in the QMENTA Platform, and you have access to:
File Modalities.
File Tags.
File metadata.
Online visualization of the files.
Subject Metadata.
Execution of analyses.
In this section, you will learn how to upload data to a Project in the QMENTA Platform using several methods, how to delete existing data from a Project, and how to download existing data from a Project.
Note
Data to be uploaded to the QMENTA Platform must be compressed and organized into ZIP files. See Collect Data for further details.
Note
De-identification of files is only supported for the DICOM header. See What is DICOM anonymization? for further details.
Log in and activate a Project following the steps in Logging In and Activating a QMENTA Project.
Bulk Upload of Data by Subject
In this example, all the DICOM data of a subject including data acquired across several imaging sessions is compressed into a single ZIP file and uploaded to the active Project.
file_path = "Path_to_ZIP_file"
subject_name = "0001"

project.upload_file(
    file_path=file_path,  # Path to ZIP file
    subject_name=subject_name,  # Subject ID
    input_data_type="qmenta_medical_image_data:3.11",
    split_data=True  # Automatically separate DICOM studies
)
The project.upload_file() method will upload the provided ZIP file to the
active Project. This will create a new Subject ID/Session ID with the status Processing files.
The Subject ID should be specified in subject_name and the
Session ID will be automatically assigned. The input_data_type corresponds to the
Medical Image Data analysis code (and version) to use to process the data.
Lastly, split_data set to True ensures the Medical Image Data analysis
automatically identifies, separates, and sorts the DICOM files of all
the sessions included within the ZIP file into distinct Session IDs.
Upon execution of the analysis, the different sessions will share the same Subject ID, and will have incremental Session IDs depending on their acquisition date.
An example result of the uploaded sessions is shown in the next figure.
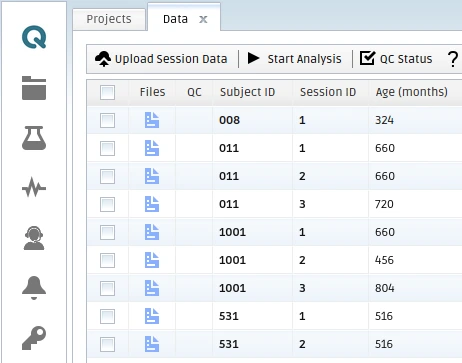
Example uploaded sessions into the QMENTA Platform.
An example result of the uploaded data within a session is shown in the next figure.
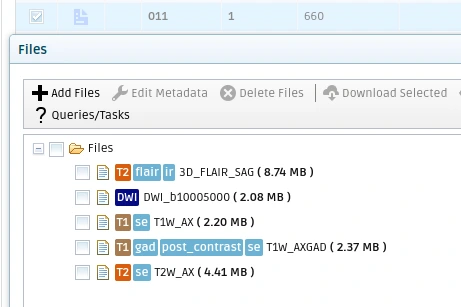
Example data uploaded within a session. See the automatically recognized modality and tags of the files.
Note
split_data==True should only be used when exclusively uploading DICOM data. This is because the Medical Image Data analysis is not able to identify the session information of other data formats such as NIfTI, PDF, or TXT.
You can test the method by uploading the following Sample ZIP File. This will result in the creation of three sessions each with different data acquired at different acquisition times.
Upload Data by Session
In this example, the data acquired within a single imaging session of the subject is uploaded, as opposed to multiple sessions at once. The data compressed into a single ZIP file corresponds to all the data from a single session.
file_path = "Path_to_ZIP_file"
subject_name = "0002"
session_id = f"{1}"

project.upload_file(
    file_path=file_path,  # Path to ZIP file
    subject_name=subject_name,  # Subject ID
    input_data_type="qmenta_medical_image_data:3.11",
    ssid=session_id  # Manually assign session ID
)
Similarly to the previous case ‘Upload by Subject’, the project.upload_file() method will
upload the provided ZIP file to the active Project. This will create a new
Subject ID/Session ID with the status Processing files.
The Subject ID should be specified in subject_name and the
Session ID in session_id.
If you want to follow this method to upload several sessions of the same subject, first compress each session into distinct ZIP files, and then make a loop iterating over each session to upload it.
Note
Using this method with default split_data==False is required to upload PDFs or other non-DICOM file types into a session.
Note
It is strongly recommended that the Session ID (SSID) is assigned as an integer casted to a string.
By using the same data provided in previous section (Sample ZIP File), this method will result in a single session containing all the data uploaded.
Note
In order to re-upload the same Sample ZIP File you need to delete first previous uploaded subject.
Delete a Session
Sessions can be deleted using the corresponding method:
project.delete_session(subject_name, session_id)
where subject_name corresponds to the Subject ID and session_id
to a Session ID (SSID) of the subject to delete from the active Project.
Delete a Subject
All the sessions of a subject can be deleted using the corresponding method:
project.delete_subject(subject_name)
where subject_name corresponds to the Subject ID to remove from the
active Project.
Download Files from a Session
Any file available in a session can be downloaded. To do so, you need to know both the Container ID of the unit where the session data is stored as well as the name of the file(s) to download.
container_id = project.get_subject_container_id(subject_name, ssid)
files = project.list_container_files(container_id)
where subject_name corresponds to the Subject ID, ssid
to the Session ID (SSID), container_id to the Container ID, and
files to the list of files available in the container.
Next, you can download a single file via:
project.download_file(container_id, files[0])
where the first file in the list files is downloaded and maintains its name. Or:
zip_name = "Name of the ZIP file"
project.download_files(container_id, files, zip_name)
where all the files in the list files are downloaded and compressed into
a ZIP file with name zip_name.
Next Steps
Explore the following sections in detail:
Data Searches – Perform data and metadata searches.
Metadata Handling – Modify metadata.
Analyses Execution – Execute analyses.
Results Handling – Retrieve and store analysis outputs.