Metadata Handling
Within a Project, there are two types of metadata:
Project-level Metadata: This metadata is configured at the Project level and applies to each session (Subject ID/Session ID).
File-level Metadata: This metadata applies to the files within a session.
In this section, you will learn how to programmatically modify any metadata available in the active Project.
To begin, log in and activate a Project following the steps in Logging In and Activating a QMENTA Project.
Project-level Metadata
To retrieve the metadata available at Project-level, use:
p_metadata = project.metadata_parameters
where p_metadata is a dictionary in which each key corresponds to a
different metadata field available. Further, each value of this dictionary is
itself another dictionary with following keys:
title: Title of the metadata parameter.
id: Identification code of the metadata parameter (this code corresponds to the definedPROJECTMETADATAKEYin Advanced Search)
type: Type of the metadata parameter.
visible: Boolean determining if the parameter is visible in the QMENTA Platform or not.
readonly: Boolean determining if the parameter is editable via the QMENTA Platform or not.
mandatory: Boolean determining if the parameter must be defined upon data upload.
description: Description of the metadata parameter.
options: List of values the metadata parameter can optionally take with type: single/multiple-option.
order: Order in which the parameter is shown in the QMENTA Platform.
An example p_metadata output taken from Project with only one parameter is:
{
'gender':
    {
    'title': 'Gender',
    'id': 'gender',
    'type': 'single_option',
    'visible': 1,
    'readonly': 1,
    'mandatory': 0,
    'description': '',
    'options': [
                {'value': 'male', 'label': 'M'},
                {'value': 'female', 'label': 'F'},
                {'value': 'unknown', 'label': 'UN'}
               ],
    'order': 1
    }
}
Note
When a new Project is created in the QMENTA Platform, it will not yet have any of these configurable Project-level metadata parameters.
Note
Project-level metadata parameters can only be configured via the QMENTA Platform.
In addition to configurable Project-level metadata parameters, there are four metadata parameters that are included in every Project within the QMENTA Platform upon Project creation.
age_at_scan: Age of the subject on the date the acquisition was performed.
date_at_scan: Date in which the acquisition was performed.
qa_status: Quality Check (QC) status of the session.
qa_comments: Quality Check (QC) comments of the session.
If the data uploaded to a session is DICOM, the fields age_at_scan and date_at_scan are automatically
populated by the Medical Image Data analysis during upload.
Now, using the methods already explained in Data Searches you can obtain the Project-level metadata parameters for the sessions available in the active Project. An example is shown below:
# Define the Subject ID.
subject_name = "0001"

# Retrieve Subject Information
subjects = [subject for subject in project.subjects_metadata if subject["patient_secret_name"] == subject_name]
where subject_name corresponds to the Subject ID and subjects
is a list of the sessions available for the Subject ID. Particularly, each
session in the list is a dictionary which contains the available Project-level
metadata such as:
age_at_scan.
date_at_scan.
md_gender.
qa_status.
qa_comments.
Note
Metadata data parameter md_gender was defined in the example above. Note that the md_ is automatically added to the identification code.
To visualize all the information available for the session you can simply:
print(subjects[0])
An example of a Project in the QMENTA Platform is shown next.
Example Project-level metadata available in a Project in the QMENTA Platform.
Project-level Metadata Modification
In order to modify the value of a given Project-level parameter of a session (Subject ID/Session ID), you have to first retrieve the parameters from the session, then modify them as needed, and subsequently apply the update to the parameters of the session, as indicated next:
# Define the Subject ID and Session ID
# to unequivocally identify a session.
subject_name = "0001"
ssid = "1"

# Retrieve the Session Information
session = [subject for subject in project.subjects_metadata if subject["patient_secret_name"] == subject_name and subject["ssid"] == ssid]
patient_id = session[0]["_id"]
age_at_scan = session[0]["age_at_scan"]

# Modify the desired parameters
tags = list(set(subject["tags"] + ["new tag"]))  # Add new tag to the subject.
metadata = {"gender":"male"}  # Update Gender metadata.

# Apply the change
project.change_subject_metadata(patient_id, subject_name, ssid, tags, age_at_scan, metadata)
If you now retrieve the metadata information of the session once again it will have been updated.
Note
Any metadata can be changed except for the patient_id.
File-level Metadata
The data available within a session also have metadata. It can be accessed by identifying the ID of the storing unit (i.e., Container ID) and then retrieving the metadata as follows:
subject_name = "0001"
ssid = "1"

# Container ID Identification
container_id = project.get_subject_container_id(subject_name, ssid)

# Files Metadata Extraction
files_metadata = project.list_container_files_metadata(container_id)
where files_metadata is a list of dictionaries each belonging to a different
file in the container. Each dictionary has the following keys:
name: Name of the file.
size: Size of the file in bytes.
tags: List of tags associated with the file.
metadata: Dictionary with further information about the file.
Note
DICOM Series are stored compressed into a ZIP file.
This last dictionary further contains the following keys:
info: Metadata file information extracted by the Medical Image Data analysis.
format: File format.
protocol: File name without the file extension.
hidden: Boolean indicating if the file is visible within the container.
modality: Modality of the file.
An example of all the metadata file information extracted during the upload process for a file can be visualized as follows:
print(f"File Name: {files_metadata[0]['name']})
print(f"File Tags: {files_metadata[0]['tags']})
print(f"File Modality: {files_metadata[0]['metadata']['modality']})
print(f"File Metadata: \n\n{files_metadata[0]['metadata']['info']}")
Note
The extraction of this metadata file information is heavily dependent on the type of file. Particularly, on the header of the file. As such, while DICOM Series have a large set of metadata available, others such as NIfTI or PNGs barely have any metadata.
An example of the file-level metadata is shown next.

Example File-level metadata. See the list of DICOM tags and their values available on the right-hand side of the image. The tags available depend on the file.
File-level Metadata Modification
Amongst all the metadata belonging to a file, only the File Modality and Tags can be
manually modified. See the example below where we have updated the modality and tags of the file in the first position of
files_metadata.:
subject_name = "0001"
ssid = "1"

# Container ID Identification
container_id = project.get_subject_container_id(subject_name, ssid)

# Get File Names
files_metadata = project.list_container_files_metadata(container_id)

# Show the name of the file to modify
print(f"File Name: {files_metadata[0]['name']})

# Modify the modality and tag of the first file of the list.
new_modality = "DWI"
new_tags = files_metadata[0]['tags'] + ["modified"]
project.change_file_metadata(container_id, files_metadata[0]['name'], new_modality, new_tags)
Quality Check (QC) Status
The Quality Check (QC) Status facilitates the process of assuring the quality of uploaded data in terms of:
Adherence to the acquisition protocol.
Image quality.
The QC status related metadata (qa_status and qa_comments)
have specific methods to read and modify it.
from qmenta.client.Project import QCStatus

# Reading the QC status related metadata
subject_name = "0001"
ssid = "1"
qc_status, qc_comments = project.get_qc_status_subject(subject_name=subject_name, ssid=ssid)

# Modifying the QC status related metadata.
patient_id = project.get_subject_id(subject_name, ssid)
qc_comments = "The quality of the images available in this session are correct."
qc_status = QCStatus.PASS
project.set_qc_status_subject(patient_id, qc_status, qc_comments)
where qc_comments is a string and qc_status is a value class
QCStatus which can be either of:
PASS
FAIL
UNDETERMINED
The QC Status is visualized in the QMENTA Platform as follows:
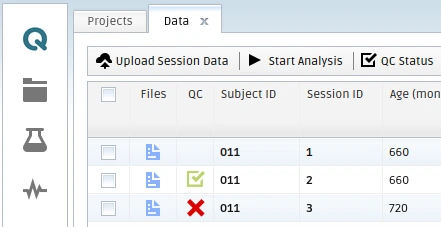
Example appearance of the different values of the QC Status in the QMENTA Platform.
Protocol Adherence Automation Analysis
In the QMENTA Platform the quality of the uploaded data can be checked in several ways and the result of the inspection can be stored within the QC Status.
The Protocol Adherence Automation analysis is an in-house analysis implemented in the QMENTA Platform that allows the comparison of the uploaded data of a session (i.e., Subject ID/Session ID) to a set of predefined rules. If the rules are aligned with the imaging acquisition protocol of the study, the Protocol Adherence Automation Analysis will facilitate quick identification of protocol deviations. See attached an example set of predefined rules specifically designed to assess the adherence of the data to the ADNI 4 protocol.
Upon execution of the analysis, the QC Status and QC Comments of the session
are updated with automatically extracted information. Particularly, if the
imaging session is in adherence with the acquisition protocol the QC Status
will be set to PASS, or to FAIL otherwise. Further, the QC
Comments are automatically updated with the summary information of the decision.
Execution of the Protocol Adherence Automation analysis requires retrieval of the session of interest’s Container ID. The analysis can then be started as follows:
subject_name = "0001"
ssid = "1"

# Container ID Identification
container_id = project.get_subject_container_id(subject_name, ssid)

# Start analysis
analysis_id = project.start_analysis(
    script_name='qmenta_protocol_adherence_automation',
    version='1.9',
    settings={"input":container_id},
    analysis_name = f"Protocol Adherence Automation (v.{version})",
)
Note
This is an example of how to programmatically start an analysis within the QMENTA Platform. For further details read section Analyses Execution.
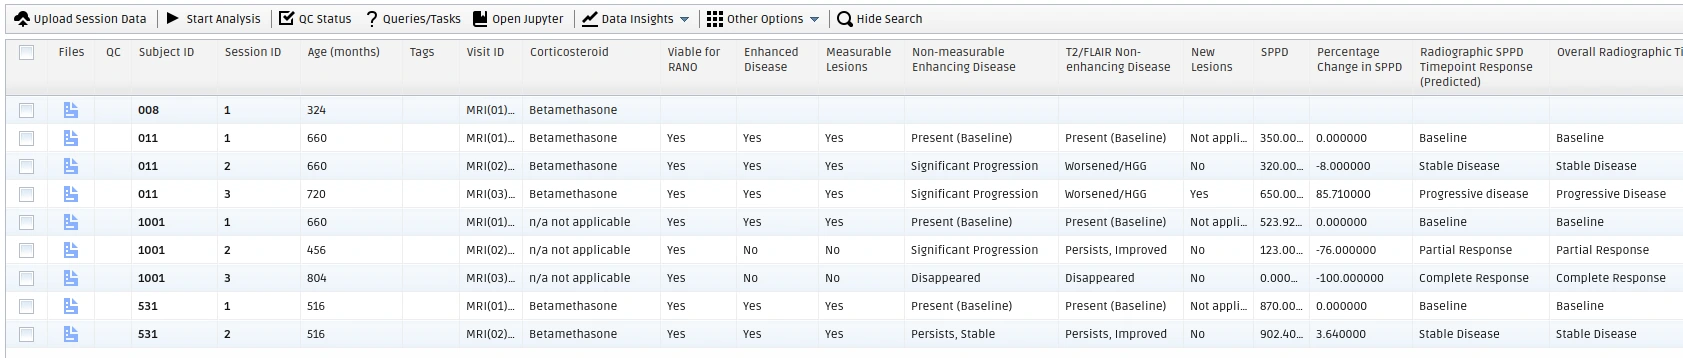
An example result of the Protocol Adherence Automation analysis.
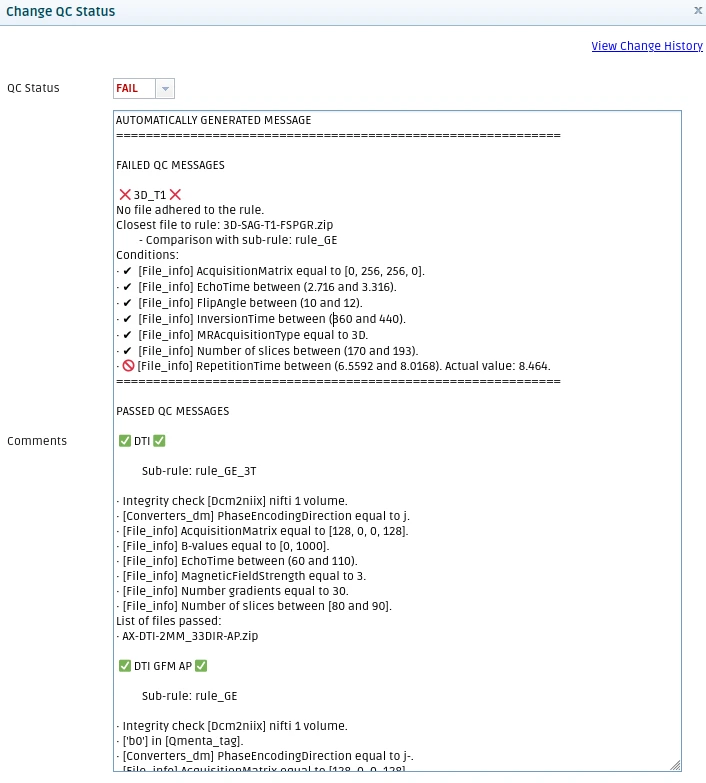
Example result of the Protocol Adherence Automation analysis. You can see the Project is configured with several rules and while the DTI and DTI GFM AP rules pass the 3D_T1 rule fails. Hence, the overall QC Status is set to FAIL.
Protocol Adherence Rules
The set of protocol adherence rules predefined in the active Project can be obtained via:
description = project.get_project_pa_rules("Path to file: Rules.json")
The method above downloads the rules applied by the Protocol Adherence
Automation analysis and stores them in the specified path. Further, it
outputs description which contains a brief description of the
rules.
After downloading the rules, you can modify them manually, and set them again in the same or other Project with the following command:
project.set_project_pa_rules("Path to file: Rules.json", description)
Note
The above command only sets the Protocol Adherence rules in the active Project.
Next Steps
Explore the following sections in detail:
Analyses Execution – Execute analyses.
Results Handling – Retrieve and store analysis outputs.