Getting started: step-by-step tutorial
This tutorial will help you learn the foundations of using the QMENTA SDK and the technological ecosystem around it, including Docker and the QMENTA Platform. By the end of this tutorial you’ll have a basic understanding of all the steps involved in implementing, testing, deploying and executing a tool in the platform. The result of completing this tutorial is available in this GitHub repository.
As a case study, you will implement a tool that takes as inputs an oncology medical image and a segmentation mask with one or more labels, and then uses the Pyradiomics library to extract radiomic features from the data. The tool will allow the user to select which classes of radiomic features wants to compute and also select a variety of image filters to be applied before extracting the radiomic features.
Note
Pyradiomics is an open-source python package for the extraction of Radiomics features from medical imaging. To learn more about the aim of the project and the features of the package take a look to the following publication: van Griethuysenet al. 2017
Before you begin
To complete this tutorial, you will need the following:
Your favorite IDE or text editor.
A basic knowledge of Python and its ecosystem.
A QMENTA Platform account. You can create a new account in this registration page.
Docker installed in your system. Check their getting started guide to know more about that.
A DockerHub account to register your image.
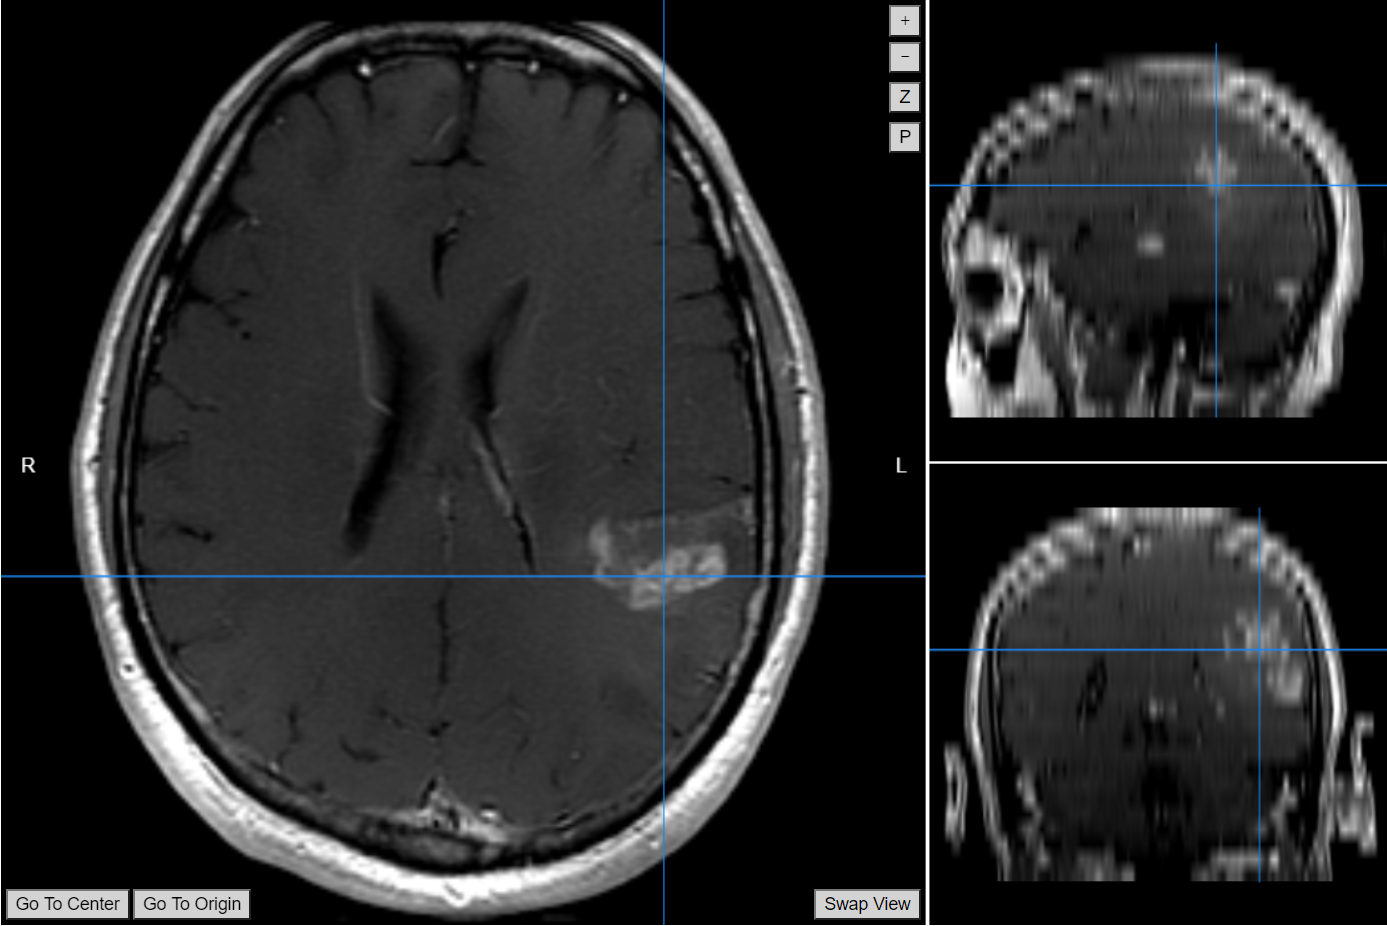
The example data provided here: a contrast-enhanced T1w MR image of a brain with a tumor, and a mask image of the region of interest.
The deployment of a tool has three main steps:
Write the main Python program.
Build a Docker container with the appropriate environment for the tool to run.
Add the tool to QMENTA platform.
Write the main Python program
Basic set up
You will need to create first a Python file named tool.py. There you should include the following skeleton code:
def run(context):
    """
    Function invoked by the SDK that passes a context object. This object can then be used
    to communicate with the platform in the context of that particular analysis to fetch files,
    report progress, and upload results, among others.

    Parameters
    ----------
    context : qmenta.sdk.context.AnalysisContext
        Analysis context object to communicate with the QMENTA Platform.
    """
    pass
This tool will require various libaries in order to process the data in the desired way, including radiomics, pandas and SimpleITK. You should add the corresponding imports before the definition of the run function:
# -*- coding: utf-8 -*-
import os
from collections import namedtuple

import nibabel as nib
import numpy as np
import pandas as pd
import radiomics
import SimpleITK as sitk
Finally, you should start populating the run function with a basic directory structure set up, that will allow you to download the input data and to store the processed results:
# Define directories for the input and output files inside the container
input_dir = os.path.join(os.path.expanduser("~"), "INPUT")
output_dir = os.path.join(os.path.expanduser("~"), "OUTPUT")
os.makedirs(output_dir, exist_ok=True)
context.set_progress(value=0, message="Processing")  # Set progress status so it is displayed in the platform
Get the input data
At this point you are ready to fetch and download the input data associated with that particular analysis. You will use two input containers (input and input_mask) and, for each of them, you will use the file_filter_condition_name argument to have a finer control over the data being processed by the tool:
# Retrieve input files
anat = context.get_files("input_anat", file_filter_condition_name="c_anat")[0].download(input_dir)
modality = context.get_files("input_anat", file_filter_condition_name="c_anat")[0].get_file_modality()

labels = context.get_files("input_mask", file_filter_condition_name="c_labels")[0].download(input_dir)
tags = context.get_files("input_mask", file_filter_condition_name="c_labels")[0].get_file_tags()
More details about containers, file filters and other input settings can be found in Parameters and Input Files.
Now, you should fetch the settings of the tool, that will be used at a later stage to control the execution of the radiomics library (i.e. to decide whether certain feature classes and image filters are used or not, among other things):
# Retrieve settings
settings = context.get_settings()
And you should finally load the input data into memory using SimpleITK and nibabel:
# Load input data into memory
mask_nib = nib.load(labels)
mask_img = mask_nib.get_data()
anat_img = sitk.GetImageFromArray(nib.load(anat).get_data())
Processing code
The first step to process the data is to prepare the radiomics.RadiomicsFeaturesExtractor instance with which we will perform the radiomics feature computation. Apart from that, you will also need to initialize a series of pandas.DataFrame and supporting dictionaries for each of the image filters that will be applied, so that we can store the resulting radiomic features:
# Create feature extractor with user specified settings
context.set_progress(value=10, message="Instantiating feature extractor")

extractor = radiomics.featureextractor.RadiomicsFeatureExtractor()
extractor.disableAllFeatures()
for feature_class in settings["feature_classes"]:  # The feature classes are retrieved from the settings
    extractor.enableFeatureClassByName(feature_class)
for image_filter in settings["image_filters"]:  # The image filters are also retrieved from the settings
    extractor.enableImageTypeByName(image_filter)
    if image_filter == "LoG":
        extractor.settings["sigma"] = [settings["sigma_LoG"]]
        extractor.settings["binWidth"] = settings["fwidth_LoG"]

# Print extractor parameters for debugging and info
print("Extraction parameters:\n\t", extractor.settings)
print("Enabled filters:\n\t", extractor.enabledImagetypes)
print("Enabled features:\n\t", extractor.enabledFeatures)

# Initialize all necessary dataframes and dicts
original_rds_df = pd.DataFrame()
original_rds_dict = {}

wavelet_names = ["HHH", "HHL", "HLH", "HLL", "LHH", "LHL", "LLH", "LLL"]
Wavelet = namedtuple("Wavelet", "df dict")
if "Wavelet" in settings["image_filters"]:
    wavelets = {}
    for name in wavelet_names:
        wavelets[name] = Wavelet(pd.DataFrame(), {})

if "LoG" in settings["image_filters"]:
    log_rds_df = pd.DataFrame()
    log_rds_dict = {}

if "Logarithm" in settings["image_filters"]:
    logarithm_rds_df = pd.DataFrame()
    logarithm_rds_dict = {}

if "Exponential" in settings["image_filters"]:
    exp_rds_df = pd.DataFrame()
    exp_rds_dict = {}
Now it’s time for some heavy lifting: you will extract all the radiomics features that were previously set up, and classify them by the image filter being applied:
# Compute radiomic features for each label and puts them in a separate sheet in the excel
context.set_progress(value=20, message="Extracting radiomic features")
for label in np.unique(mask_img)[1:]:
    label_mask = np.zeros_like(mask_img)
    label_mask[mask_img == label] = 1
    label_sitk = sitk.GetImageFromArray(label_mask)
    features = extractor.execute(anat_img, label_sitk)

    for key, value in features.items():
        if "original" in key:
            original_rds_dict[key] = [value]
        elif "sigma" in key:
            log_rds_dict[key] = [value]
        elif "logarithm" in key:
            logarithm_rds_dict[key] = [value]
        elif "exponential" in key:
            exp_rds_dict[key] = [value]
        else:
            for name in wavelet_names:
                if name in key:
                    wavelets[name].dict[key] = [value]
                    break

    original_rds_df["label" + str(label)] = pd.Series(original_rds_dict)
    original_rds_dict = {}

    if "Wavelet" in settings["image_filters"]:
        for name in wavelet_names:
            wavelets[name].df["label" + str(label)] = pd.Series(wavelets[name].dict)
            wavelets[name]._replace(dict={})

    if "LoG" in settings["image_filters"]:
        log_rds_df["label" + str(label)] = pd.Series(log_rds_dict)
        log_rds_dict = {}

    if "Logarithm" in settings["image_filters"]:
        logarithm_rds_df["label" + str(label)] = pd.Series(logarithm_rds_dict)
        logarithm_rds_dict = {}

    if "Exponential" in settings["image_filters"]:
        exp_rds_df["label" + str(label)] = pd.Series(exp_rds_dict)
        exp_rds_dict = {}
You will end this section by creating a series of CSV files and filtered images that will be later uploaded to the QMENTA Platform as results:
# Create CSV files from the extracted radiomics features
original_radiomics_csv = os.path.join(output_dir, "original_radiomic_features.csv")
original_rds_df.to_csv(original_radiomics_csv)
radiomics_csv_to_upload = []  # List[Tuple[src_filepath : str, dst_platform_path : str, tags : Set]]
filtered_images_to_upload = []  # List[Tuple[src_filepath : str, dst_platform_path : str, tags : Set]]

if "Wavelet" in settings["image_filters"]:
    wavelet_generator = radiomics.imageoperations.getWaveletImage(anat_img, sitk.GetImageFromArray(mask_img))
    for wavelet in wavelet_generator:
        src_filepath = os.path.join(output_dir, wavelet[1] + "_filtered_image.nii.gz")
        dst_platform_path = "Wavelet/" + wavelet[1] + "_filtered_image.nii.gz"
        tags = {"wavelet"}

        nib.save(
            nib.Nifti1Image(sitk.GetArrayFromImage(wavelet[0]), mask_nib.affine, mask_nib.header),
            src_filepath,
        )

        filtered_images_to_upload.append((src_filepath, dst_platform_path, tags))

    for name in wavelet_names:
        dst_platform_path = "Wavelet/wavelet_{}_radiomic_features.csv".format(name)
        src_filepath = os.path.join(output_dir, "wavelet_{}_radiomic_features.csv".format(name))
        tags = {"wavelet", "csv"}

        wavelets[name].df.to_csv(src_filepath)

        radiomics_csv_to_upload.append((src_filepath, dst_platform_path, tags))

if "LoG" in settings["image_filters"]:
    log_generator = radiomics.imageoperations.getLoGImage(
        anat_img, sitk.GetImageFromArray(mask_img), sigma=[settings["sigma_LoG"]], binWidth=settings["fwidth_LoG"]
    )
    log_image = next(log_generator)

    src_filepath = os.path.join(output_dir, log_image[1] + "_filtered_image.nii.gz")
    dst_platform_path = "LoG/" + log_image[1] + "_filtered_image.nii.gz"
    tags = {"LoG"}

    nib.save(
        nib.Nifti1Image(sitk.GetArrayFromImage(log_image[0]), mask_nib.affine, mask_nib.header),
        src_filepath,
    )

    filtered_images_to_upload.append((src_filepath, dst_platform_path, tags))

    dst_platform_path = "LoG/LoG_radiomic_features.csv"
    src_filepath = os.path.join(output_dir, "LoG_radiomic_features.csv")
    tags = {"LoG", "csv"}

    log_rds_df.to_csv(src_filepath)

    radiomics_csv_to_upload.append((src_filepath, dst_platform_path, tags))

if "Logarithm" in settings["image_filters"]:
    logarithm_generator = radiomics.imageoperations.getLogarithmImage(anat_img, sitk.GetImageFromArray(mask_img))
    logarithm_image = next(logarithm_generator)

    src_filepath = os.path.join(output_dir, logarithm_image[1] + "_filtered_image.nii.gz")
    dst_platform_path = "Logarithm/" + logarithm_image[1] + "_filtered_image.nii.gz"
    tags = {"logarithm"}

    nib.save(
        nib.Nifti1Image(sitk.GetArrayFromImage(logarithm_image[0]), mask_nib.affine, mask_nib.header),
        src_filepath,
    )

    filtered_images_to_upload.append((src_filepath, dst_platform_path, tags))

    dst_platform_path = "Logarithm/logarithm_radiomic_features.csv"
    src_filepath = os.path.join(output_dir, "logarithm_radiomic_features.csv")
    tags = {"logarithm", "csv"}

    logarithm_rds_df.to_csv(src_filepath)

    radiomics_csv_to_upload.append((src_filepath, dst_platform_path, tags))

if "Exponential" in settings["image_filters"]:
    exponential_generator = radiomics.imageoperations.getExponentialImage(
        anat_img, sitk.GetImageFromArray(mask_img)
    )
    exponential_image = next(exponential_generator)

    src_filepath = os.path.join(output_dir, exponential_image[1] + "_filtered_image.nii.gz")
    dst_platform_path = "Exponential/" + exponential_image[1] + "_filtered_image.nii.gz"
    tags = {"exponential"}

    nib.save(
        nib.Nifti1Image(sitk.GetArrayFromImage(exponential_image[0]), mask_nib.affine, mask_nib.header),
        src_filepath,
    )

    filtered_images_to_upload.append((src_filepath, dst_platform_path, tags))

    dst_platform_path = "Exponential/exponential_radiomic_features.csv"
    src_filepath = os.path.join(output_dir, "exponential_radiomic_features.csv")
    tags = {"exponential", "csv"}

    exp_rds_df.to_csv(src_filepath)

    radiomics_csv_to_upload.append((src_filepath, dst_platform_path, tags))
Upload the results
Finally, you should upload the results to be set as the output of the corresponding analysis in the QMENTA Platform:
# Upload original image, mask and radiomic features extracted from them
context.set_progress(value=90, message="Uploading results")

context.upload_file(anat, "anatomical_image.nii.gz", modality=modality)
context.upload_file(labels, "labels_mask.nii.gz", tags=tags)
context.upload_file(original_radiomics_csv, "original_radiomic_features.csv", tags={"csv"})

# Upload filtered images and radiomic CSVs
all_results = filtered_images_to_upload + radiomics_csv_to_upload
for src_filepath, dst_platform_path, tags in all_results:
    context.upload_file(
        src_filepath,
        dst_platform_path,
        tags=tags,
    )
Wrap up
All together, the tool.py module looks like the following.
In this tutorial, we have used the qmenta.sdk.context.AnalysisContext interface for the following purposes:
Download the input data:
context.get_files("input_anat", file_filter_condition_name="c_anat")[0].download(input_dir)
Retrieve the settings defined for the analysis:
context.get_settings()
Set the progress status to monitor the analysis from the platform:
context.set_progress(value=10, message="Instantiating feature extractor")
Upload the result files from the container to the platform:
context.upload_file(anat, 'anatomical_image.nii.gz', modality=modality)
Test the tool locally
At this point you can test the Python program locally.
In order to do so, you will need to install the required dependencies on your Python installation (e.g. system-wide installation, Python environment manager such as virtualenv or pyenv, conda, etc.):
python -m pip install pyradiomics SimpleITK nibabel numpy pandas qmenta-sdk-lib
You will need to create a directory structure like the one depicted below, and there you should download the example data mentioned in Before you begin:
data
├── input
│   ├── input_anat
│   │   └── brain1_image.nii.gz
│   └── input_mask
│       └── brain1_label.nii.gz
└── output
And then you will need to create two configuration files: settings.json and settings_values.json. The purpose of those files and their syntax is outside of the scope of this tutorial. If you want to know more about this topic we encourage you to read the guide on Parameters and Input Files.
The settings.json file will contain the following:
[
{
"type": "info",
"content": "Required inputs:<br><b>• Oncology medical image</b>: 3D image to analyze<br> Accepted modalities: 'T1', 'T2', 'CT', 'SCALAR'<br><b>• Labels mask</b>: Mask containing one or more labels.<br> Accepted tags: 'mask','labels'"
},
{
"type": "container",
"title": "Oncology medical image",
"id": "input_anat",
"mandatory": 1,
"file_filter": "c_anat[1,1]((m'CT'|m'T1'|m'T2'|m'SCALAR'))",
"in_filter": ["mri_brain_data"],
"out_filter": [],
"batch": 1,
"anchor": 1,
"section": "data"
},
{
"type": "container",
"title": "Labels mask",
"id": "input_mask",
"mandatory": 1,
"file_filter": "c_labels[1,1]((t'labels'|t'mask'))",
"in_filter": ["mri_brain_data"],
"out_filter": [],
"batch": 1,
"anchor": 1,
"section": "data"
},
{
"type": "line"
},
{
"type": "heading",
"content": "Radiomic feature classes"
},
{
"type": "multiple_choice",
"id": "feature_classes",
"title": "Feature classes",
"mandatory": "1",
"options": [
["firstorder", "First Order Features"],
["shape", "Shape Features"],
["glcm", "Gray Level Co-occurrence Matrix (GLCM)"],
["glszm", "Gray Level Size Zone Matrix (GLSZM)"],
["ngtdm", "Neighbouring Gray Tone Difference Matrix (NGTDM)"],
["gldm", "Gray Level Dependence Matrix (GLDM)"]
],
"default": ["firstorder", "shape", "glcm", "glszm"]
},
{
"type": "line"
},
{
"type": "heading",
"content": "Image filters"
},
{
"type": "multiple_choice",
"id": "image_filters",
"title": "Image filters",
"mandatory": "0",
"options": [
["Wavelet", "Wavelet"],
["LoG", "Laplacian of Gaussian"],
["Logarithm", "Logarithm"],
["Exponential", "Exponential"]
],
"default": []
},
{
"type": "indent",
"content": "Parameters for Laplacian of Gaussian filter. Only relevant if that filter is selected to be applied :"
},
{
"type": "decimal",
"title": "Sigma value. Defines how coarse the emphasised texture is.",
"id": "sigma_LoG",
"mandatory": 0,
"default": 1.0,
"min": 0.0001
},
{
"type": "decimal",
"title": "Filter width of the Gaussian Kernel (mm)",
"id": "fwidth_LoG",
"mandatory": 0,
"default": 20.0,
"min": 1
}
]
While the settings_values.json file will contain:
{
    "input_anat": [
        {
            "path": "brain1_image.nii.gz",
            "file_filter_condition_name": "c_anat",
            "modality": "T1",
            "tags": ["post_contrast", "gad"]
        }
    ],
    "input_mask": [
        {
            "path": "brain1_label.nii.gz",
            "file_filter_condition_name": "c_labels",
            "modality": "",
            "tags": ["mask"]
        }
    ],
    "feature_classes": ["firstorder", "shape", "glcm", "glszm", "ngtdm", "gldm"],
    "image_filters": ["Wavelet", "LoG", "Logarithm", "Exponential"],
    "sigma_LoG": 2.0,
    "fwidth_LoG": 10.0
}
Once those requirement are fullfilled, you can just create a Bash script named test_local_sdk.sh and include the following statements:
#!/usr/bin/env bash

python -m qmenta.sdk.local.executor settings.json settings_values.json ./data/input/ ./data/output/ --tool-path tool:run
And then run the following commands to test your tool:
chmod +x ./test_local_sdk.sh
./test_local_sdk.sh
In the following section (Package your tool in a Docker image) you will be able to test the tool packaged in a Docker image, an scenario that represents much more faithfully the execution environment in which the tool will be executed when launched through the platform.
Package your tool in a Docker image
You will now build a Docker image using a Dockerfile. The Dockerfile containing the instructions to create that image should be placed at the same level as the tool.py module:
FROM python:3.6
LABEL maintainer="QMENTA Inc."
WORKDIR "/root"

# Add tool script
COPY tool.py /root/tool.py

# Install and upgrade all the required libraries and tools (in this case only python libraries are needed)
RUN python -m pip install --upgrade pip
RUN python -m pip install pyradiomics SimpleITK nibabel numpy pandas qmenta-sdk-lib

# Configure entrypoint
RUN python -m qmenta.sdk.make_entrypoint /root/entrypoint.sh /root/
RUN chmod +x /root/entrypoint.sh
In order to build the image you will have to open a terminal and run the following commands:
docker build -t {namespace}/radiomics_tool:1.0 .
Where {namespace} is the name of the Docker namespace, which should coincide with your DockerHub account username, radiomics_tool is the name of the image repository (tool) and 1.0 is the version tag (tool version).
When the build process finishes, you will have a Docker image containing your SDK tool ready to be tested locally, and eventually, to be registered in the platform. First check that the Docker image is available:
docker images {namespace}/radiomics_tool
Now it is time to test it. First, you will have to download the testing script available in the GitHub repository for this tutorial: test_container_sdk.py
Then you should invoke the downloaded Python script with the following arguments:
python test_container_sdk.py {namespace}/radiomics_tool:1.0 ./data/input ./data/output --settings settings.json --values settings_values.json
where, again, {namespace} is the name of the Docker namespace, which should coincide with your DockerHub account username. More details about testing your tools locally can be found in Testing tools locally.
Once you have validated that the tool completes successfully, the next step is to register the image in DockerHub. To do so, you will have to log in first:
docker login
At this point you will be prompted for your username and password. Once authenticated, you will be able to push the image to the Docker registry:
docker push {namespace}/radiomics_tool:1.0
For more information about working with Docker images see Working with Docker images.
Tip
A list of QMENTA’s public Docker images can be found at the qmentasdk Docker registry.
Add the tool to the platform
To follow this step you will need to have an account in QMENTA Platform and have the ability to deploy tools enabled.
Note
Contact us at info@qmenta.com in order to grant you developer privileges to add tools to the QMENTA platform.
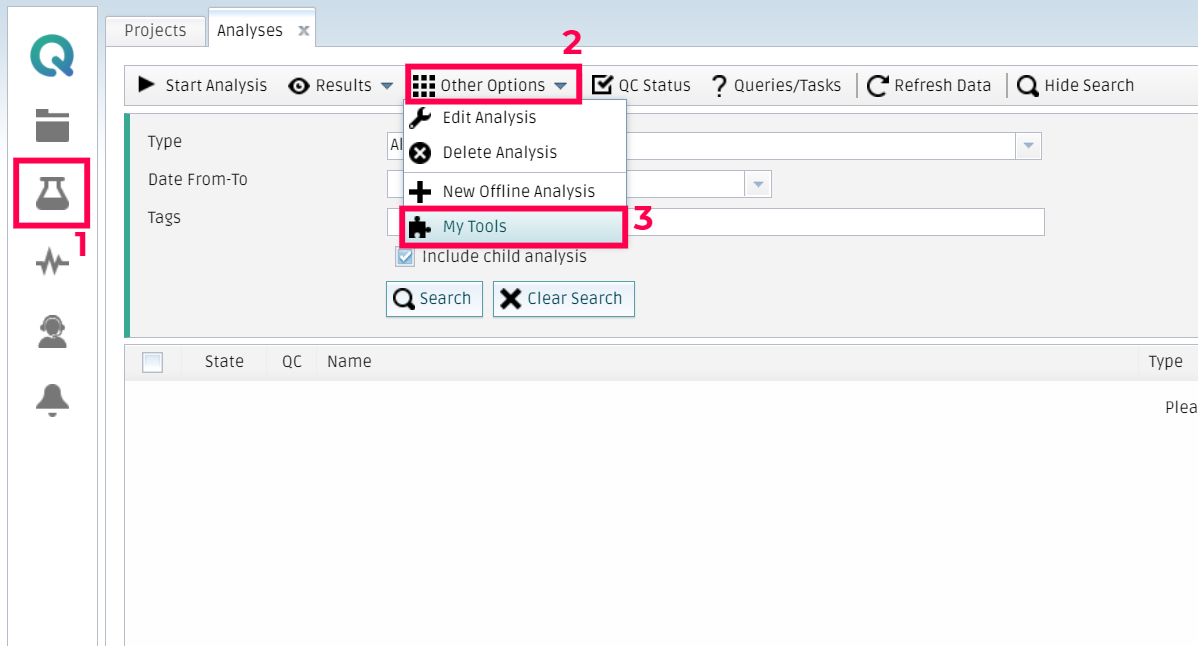
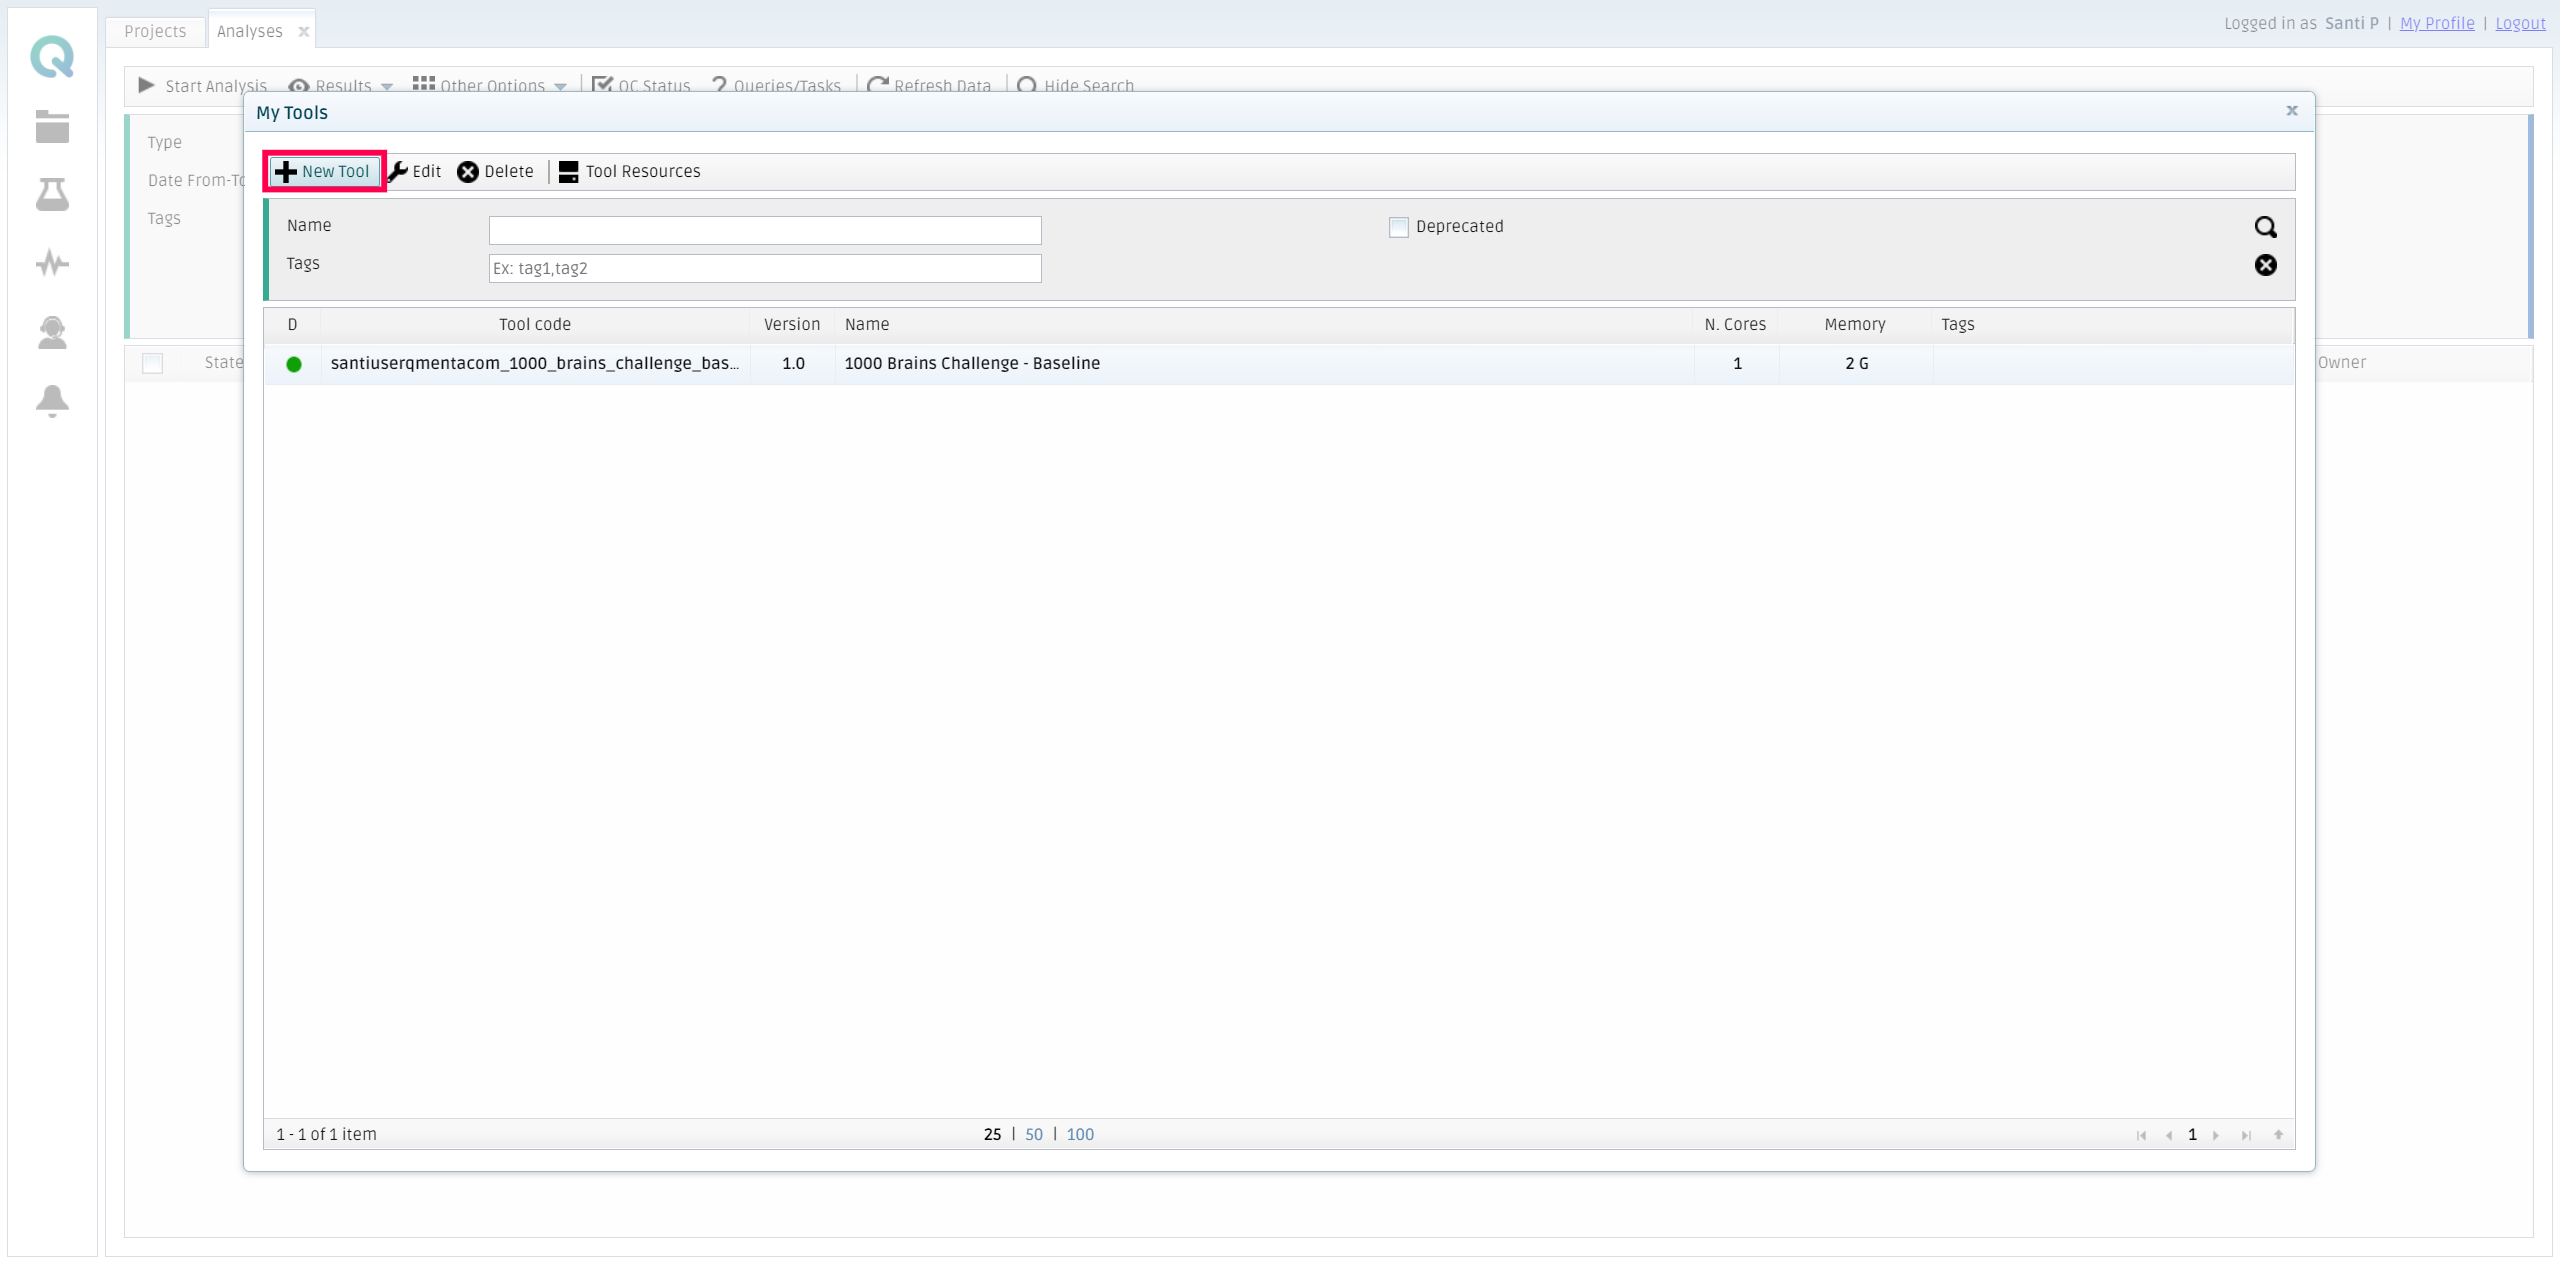
Log in to the platform and access the My Analysis menu. Then, click on Other Options and then My tools.
Once the form is visible, you should click on New tool.
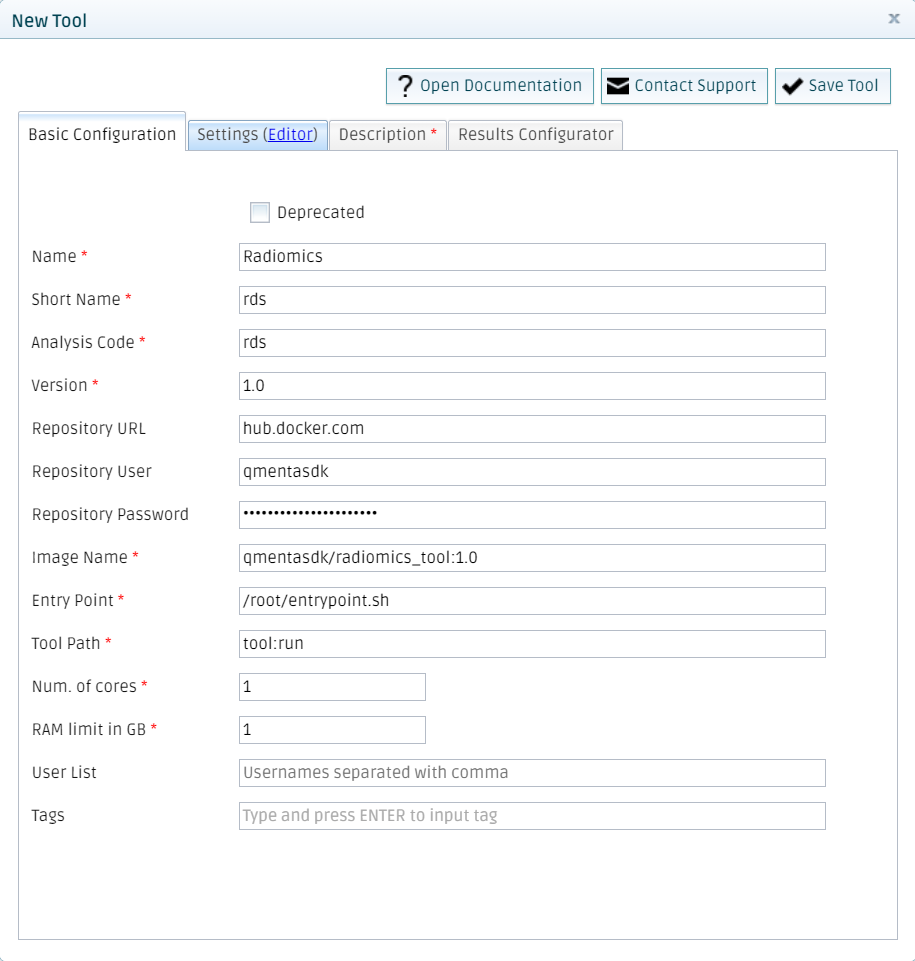
Fill all the fields with the information about your tool. Bear in mind that here the chosen {namespace} is _qmentasdk_, but you should use your own, as explained in Package your tool in a Docker image.
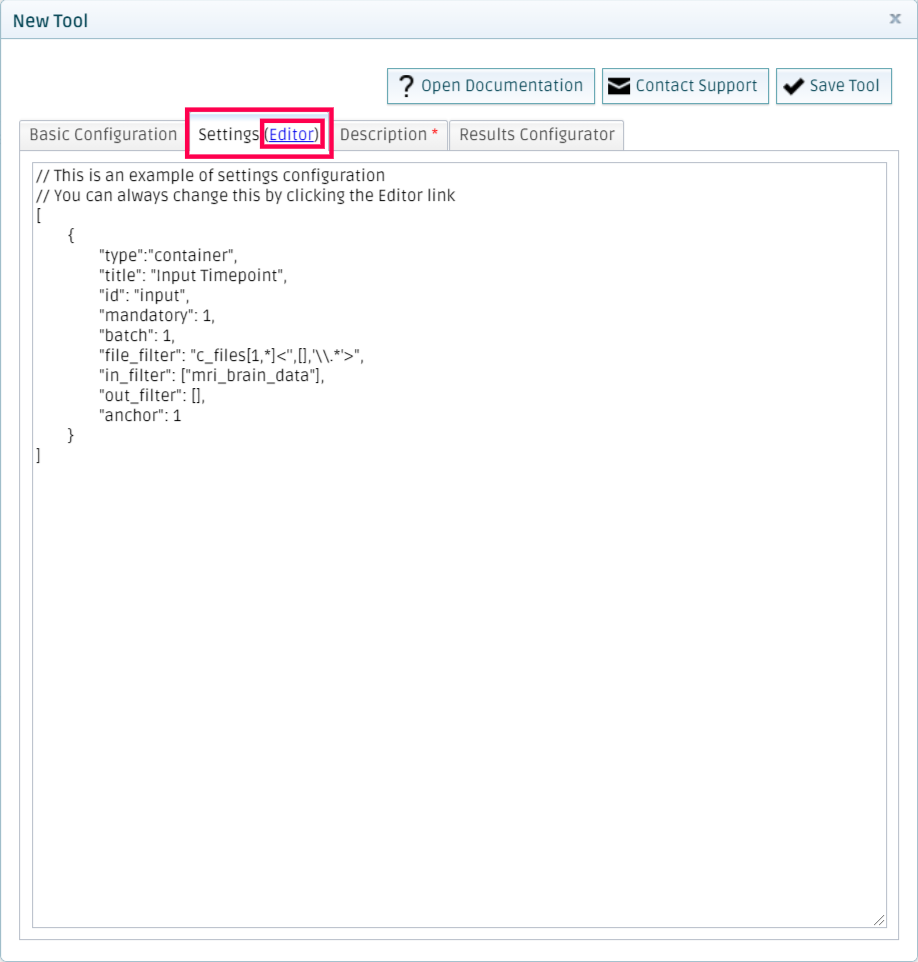
Add settings
Go to the settings tab and click on Editor.
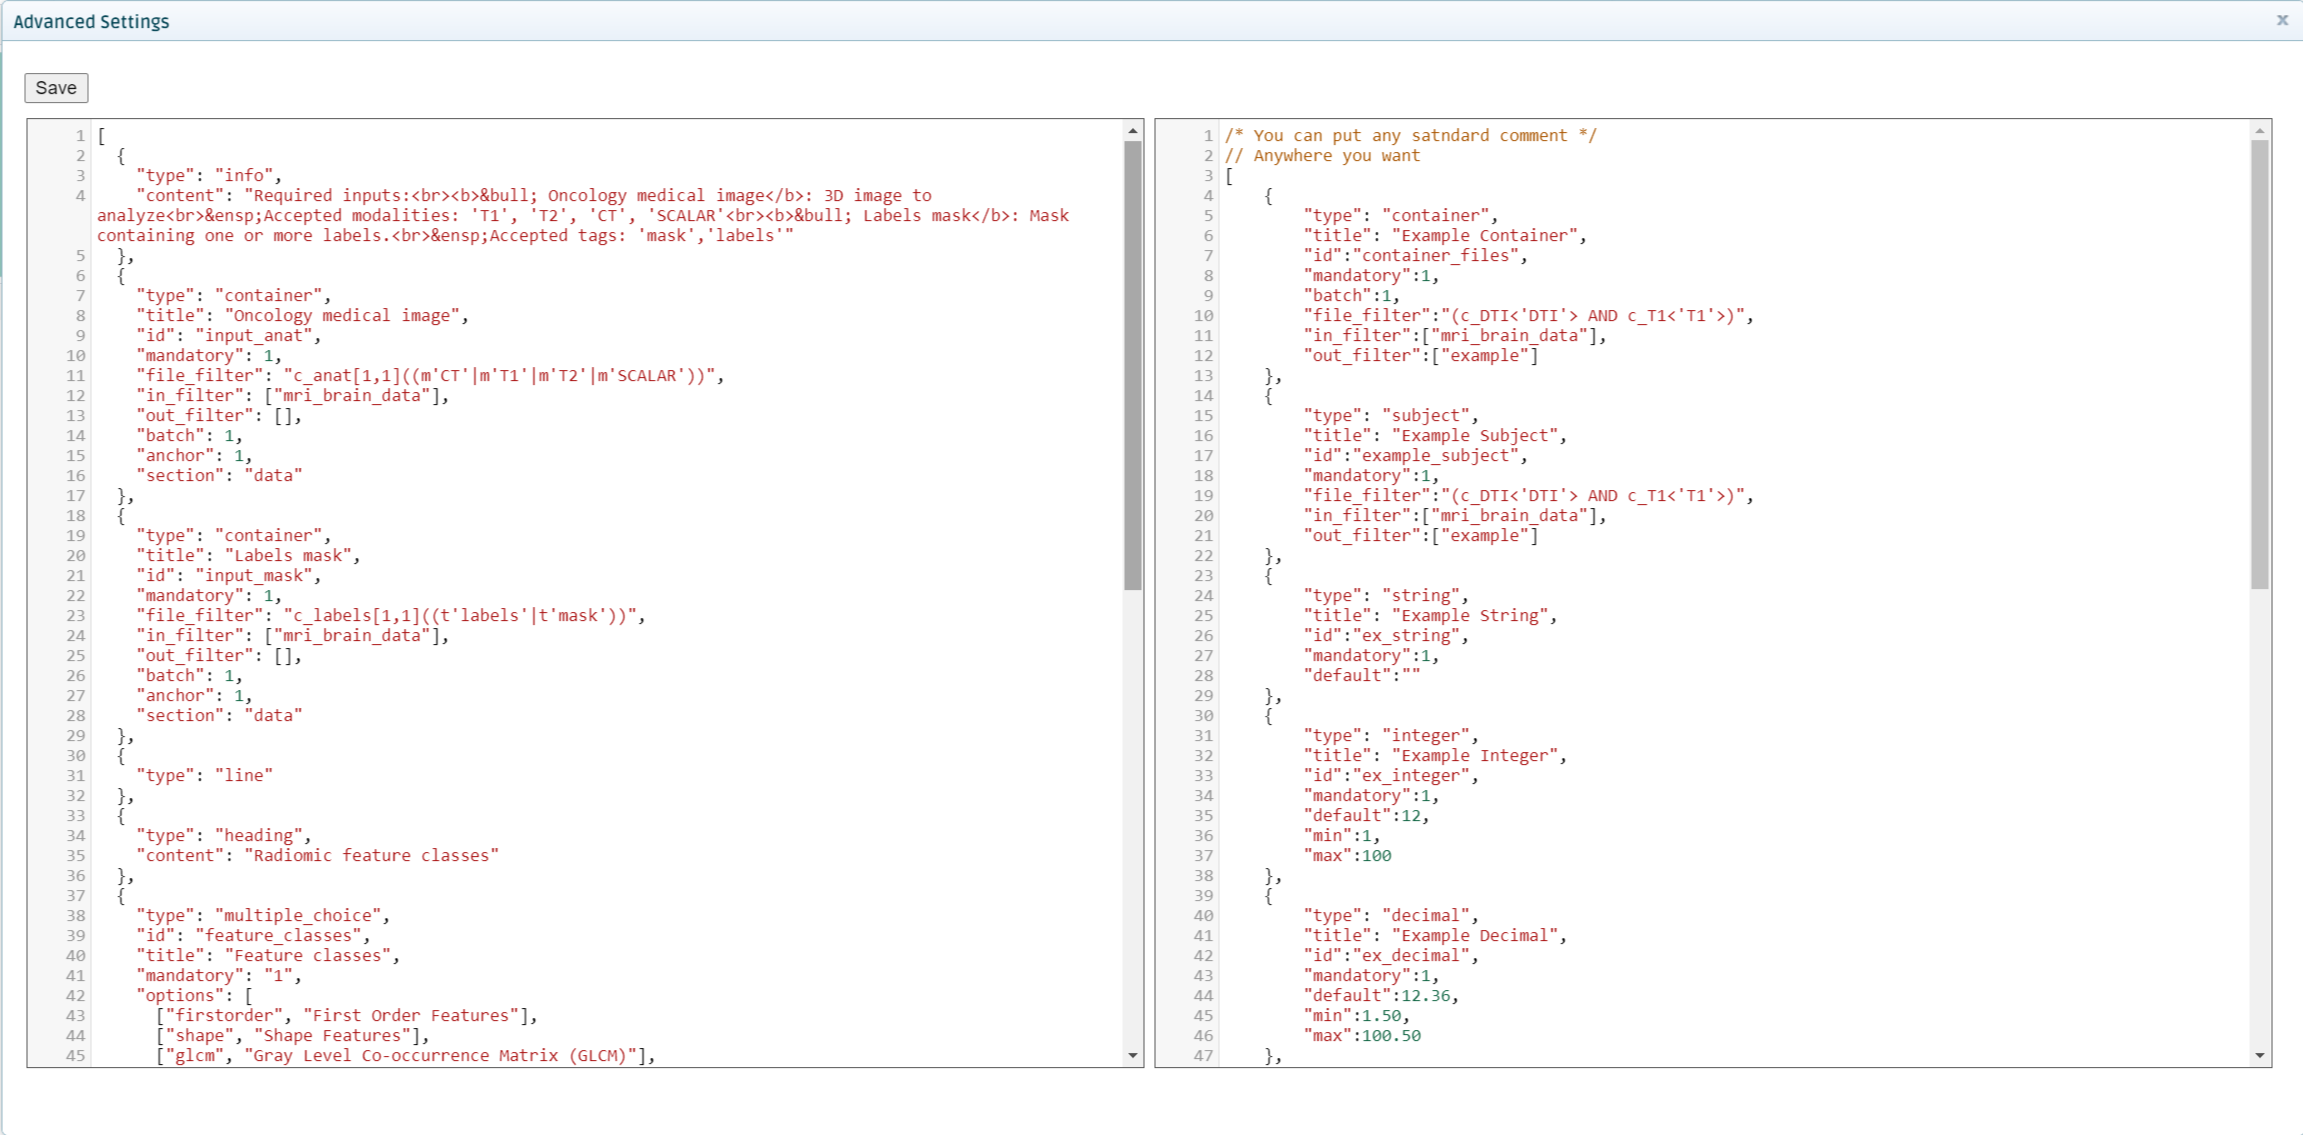
Use the examples on the right screen to define the settings that your tool needs. This includes input containers and parameters of the tool. You should copy the settings specified in the settings.json file that you created in Test the tool locally.
Add a description
This texts is going to be displayed when running the tool from the platform.
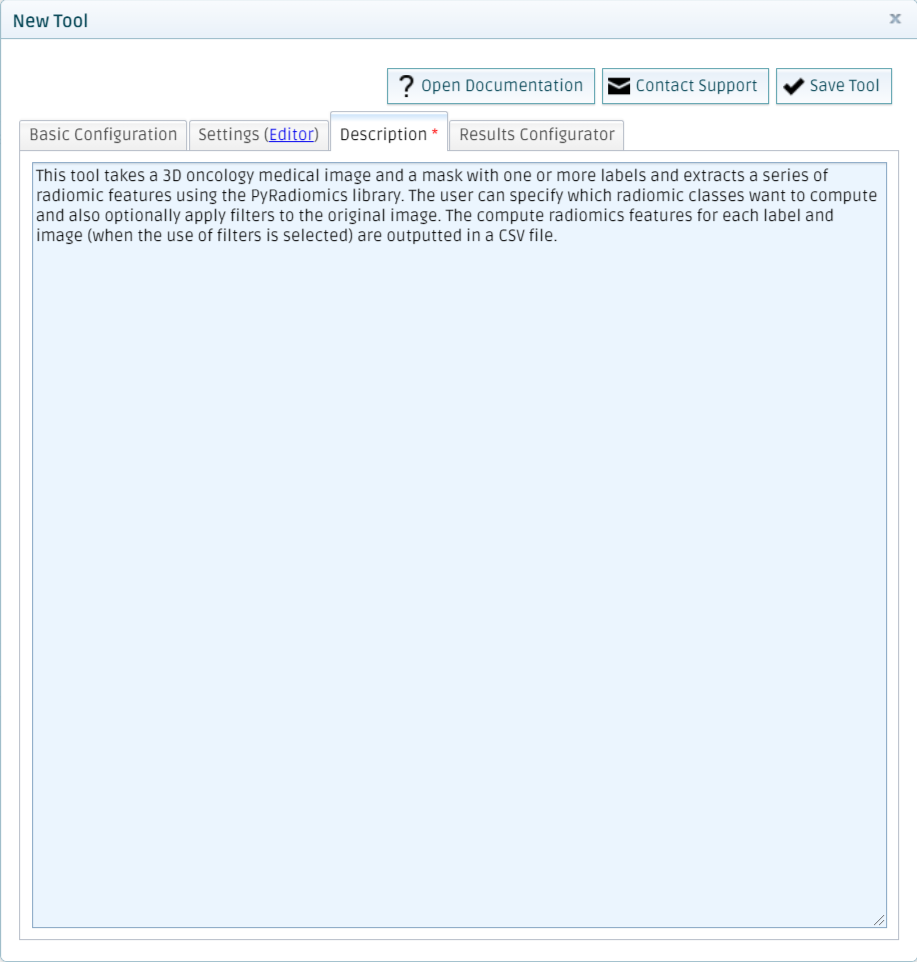
Finally, click on Save Tool. The platform will pop-up a success message, and after closing the form to add tools, you will see your newly created tool in your My Tools section.
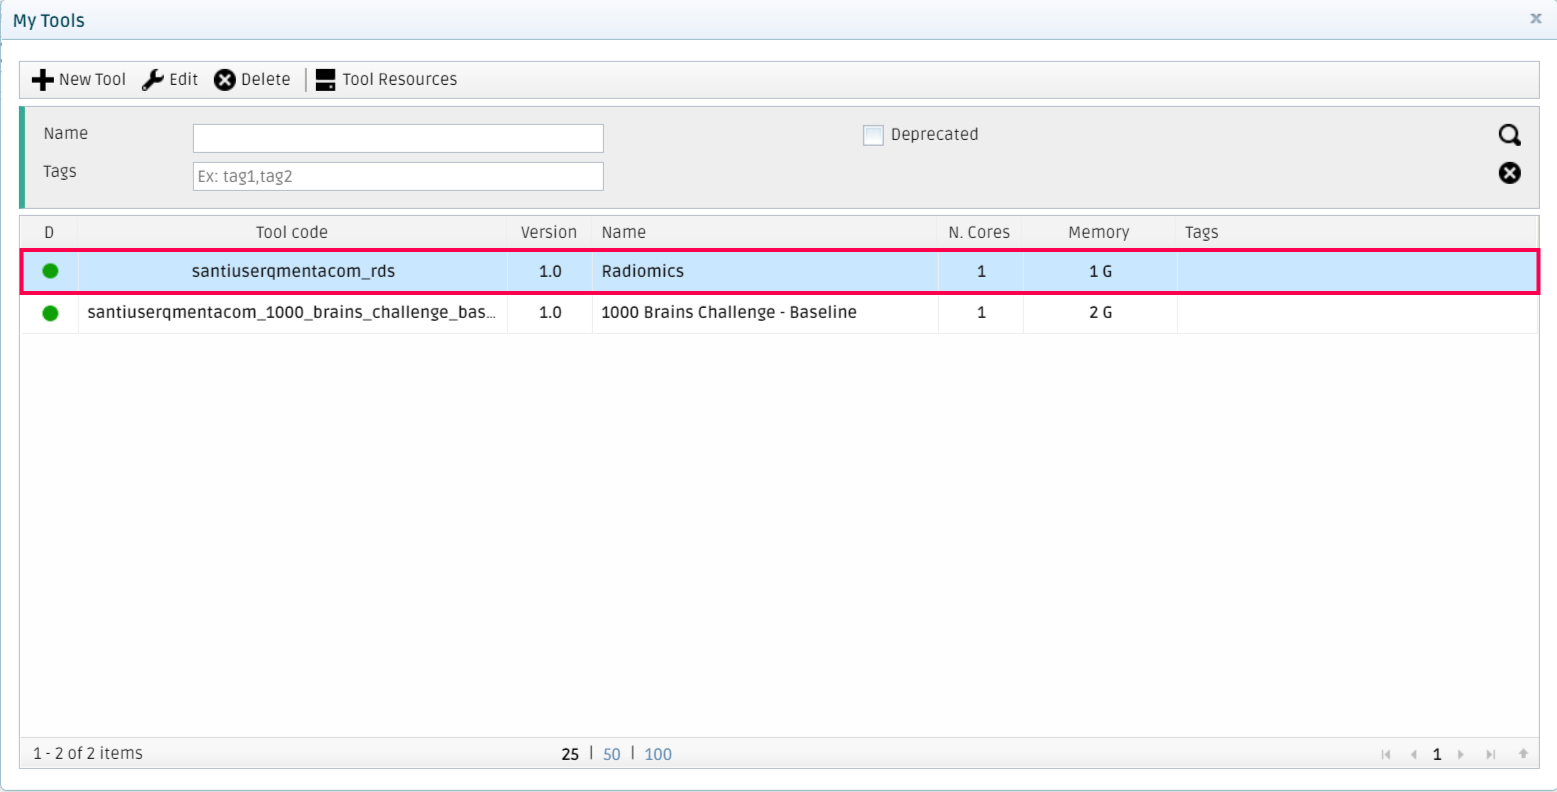
Note
As you will have noticed, your platform username is preprended to the tool_code you specify. This is done so that each tool is unique within the whole platform, so you don’t have to worry about having unique names for your tools.
Run your tool in the QMENTA platform
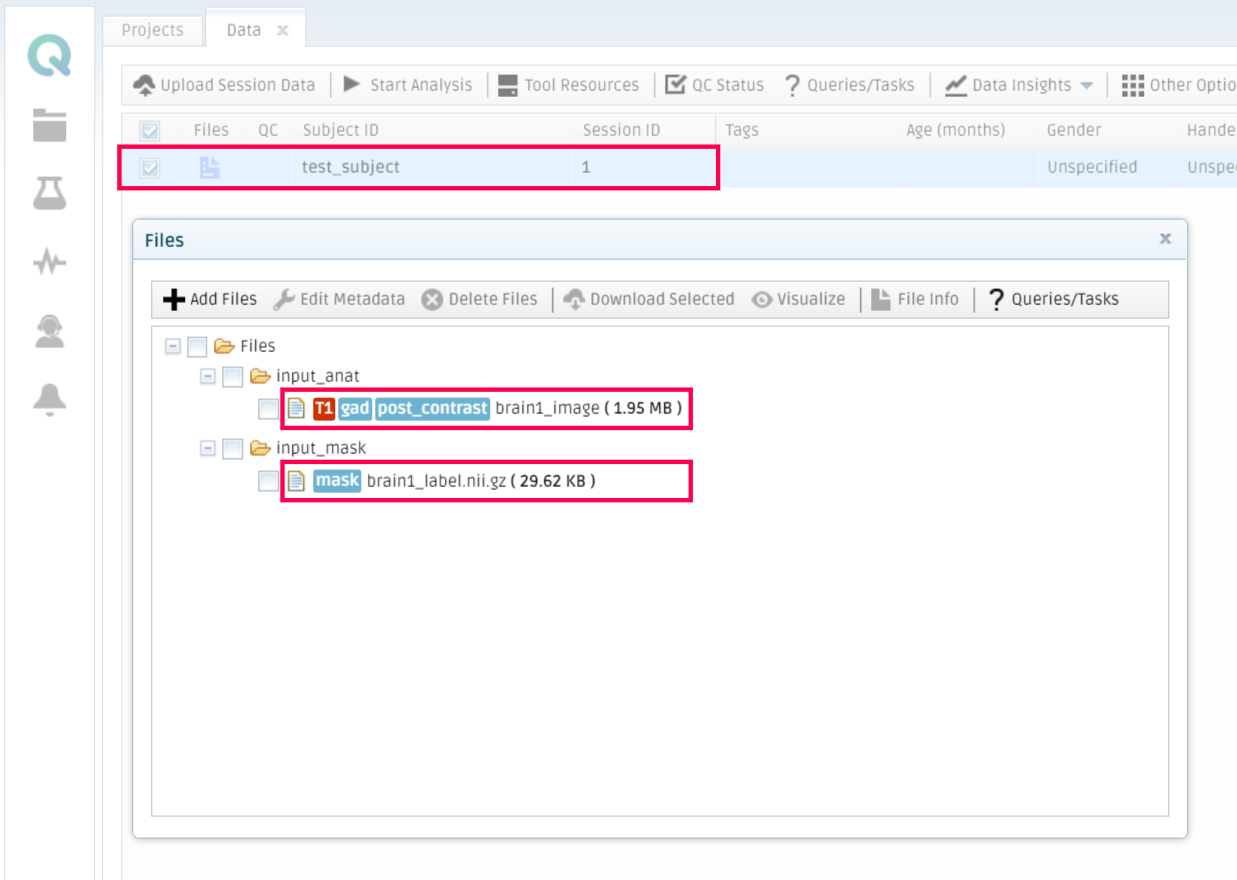
After the successful completion of the previous steps, the tool is ready to be run in the QMENTA Platform.
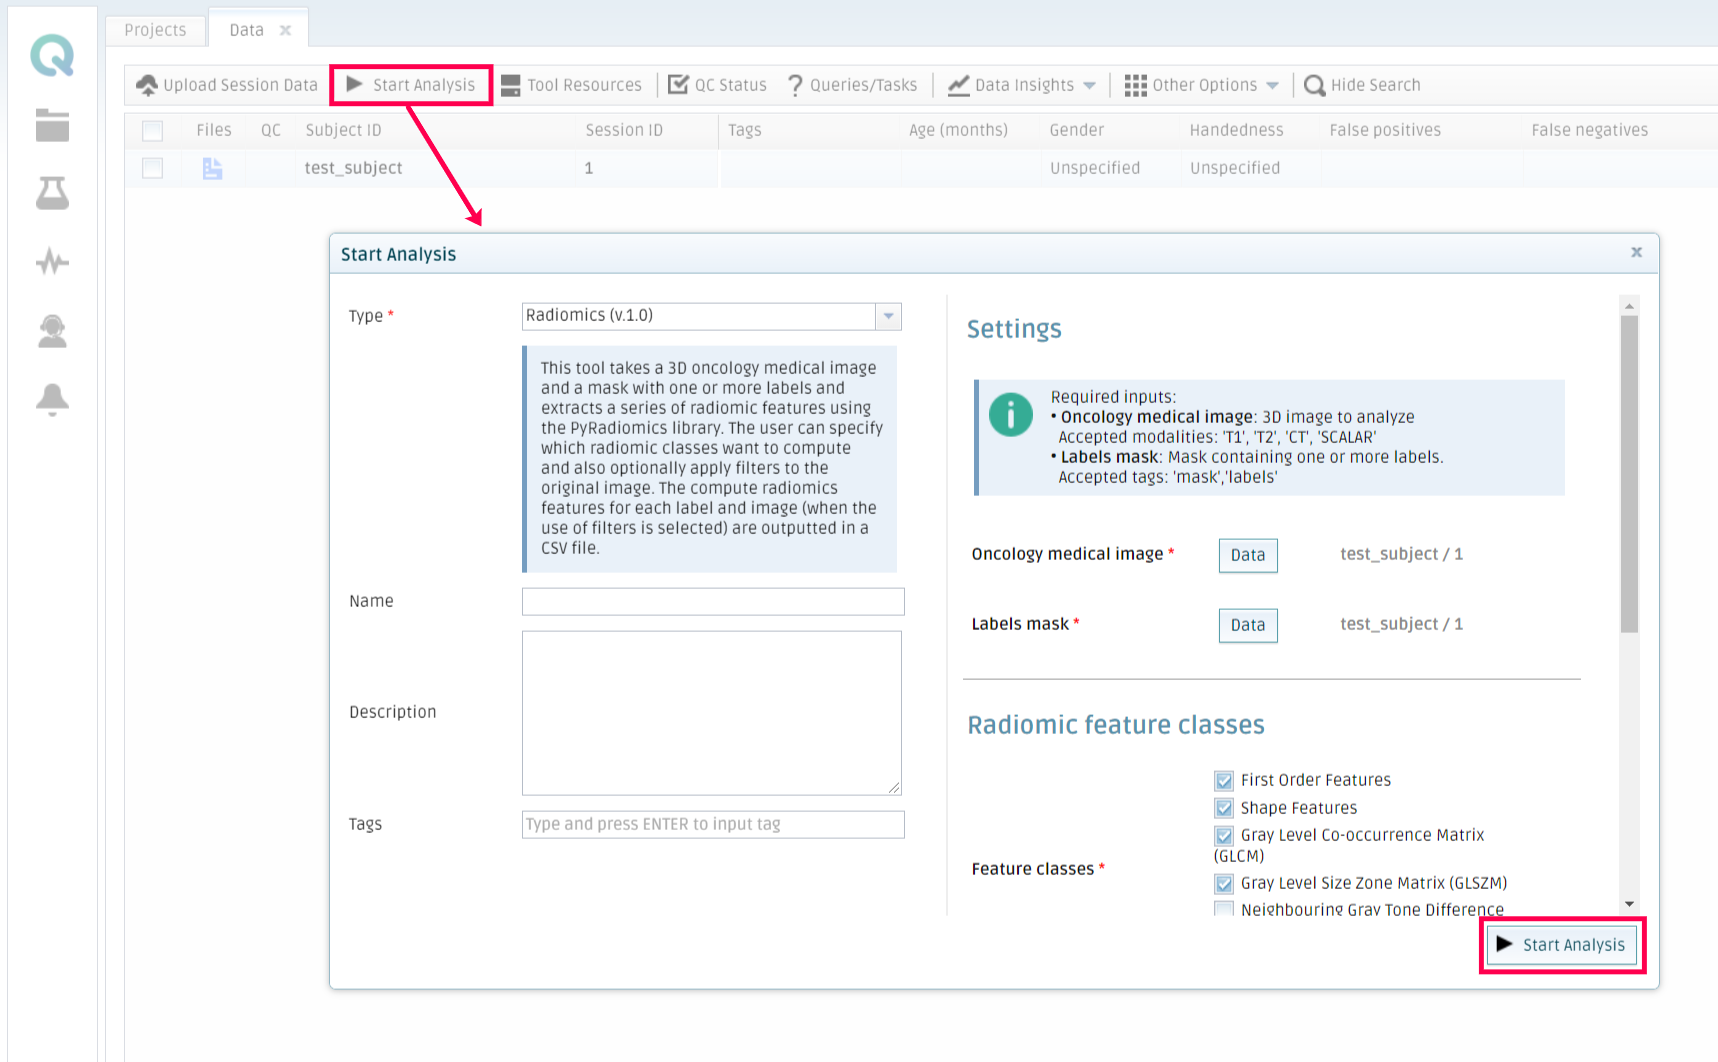
To do so, you should go to My Data in the platform, select a subject that contains the necessary files to run the tool (properly tagged) and click on Start Analysis. Then select your tool, choose the parameters you want it to run with and optionally add a name and a description to the analysis. Click on Start Analysis when the configuration is ready.
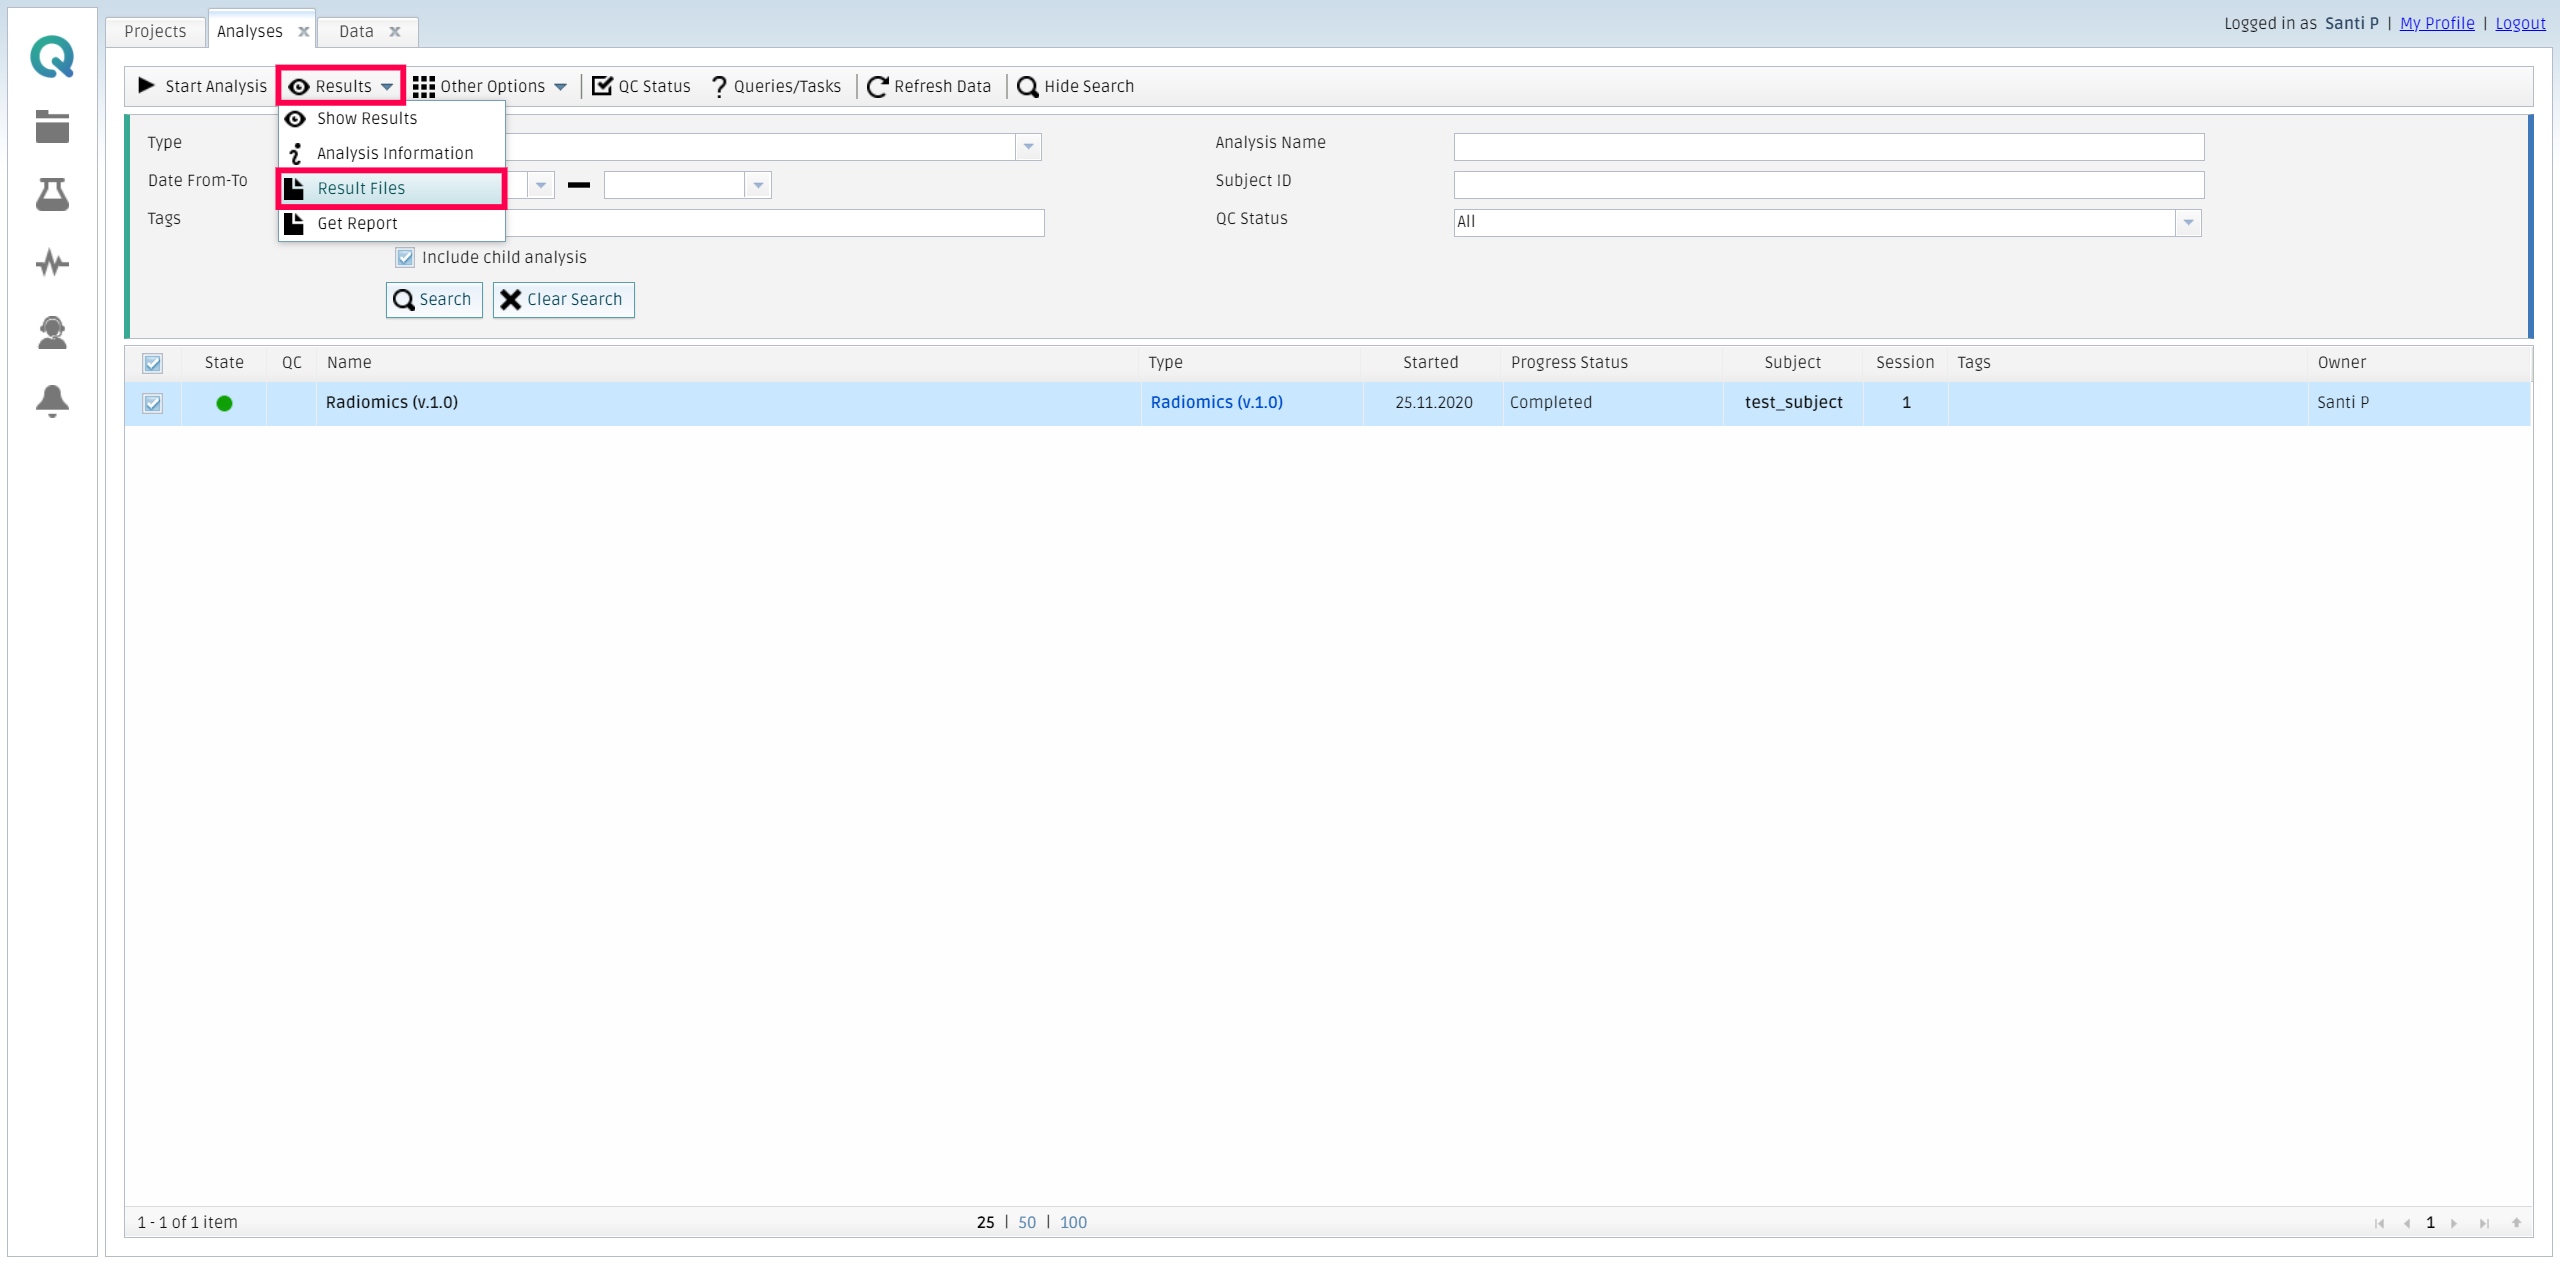
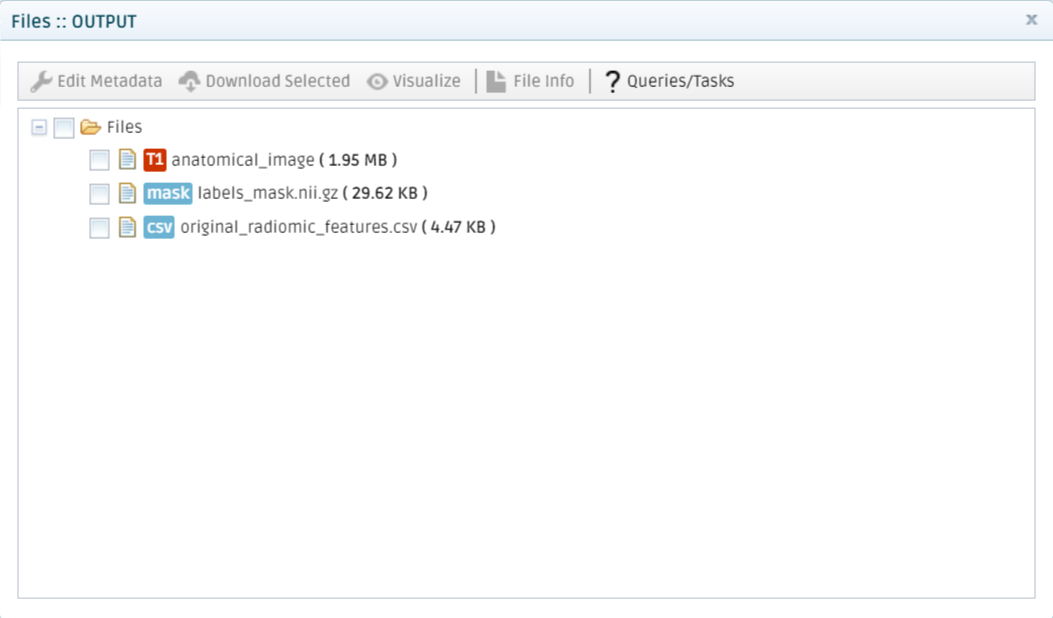
The platform will run the analysis and send an email whenever it finishes. Then, you can retrieve the results by going to My Analysis, selecting the finished analysis, and then click on Result files inside the Results tab.