Note
This page explains how to work with Docker images in general and is not meant to be strictly followed when building a tool with the QMENTA SDK.
Working with Docker images
Docker images are like blueprints of fully-fledged virtual machines that can run in any computer as a result of containing all they require inside them.
Docker images can be modified/extended dynamically using two distinct methods: committing the changes made in containers to new images, or using a Dockerfile. Both methods can be used to develop your own tools.
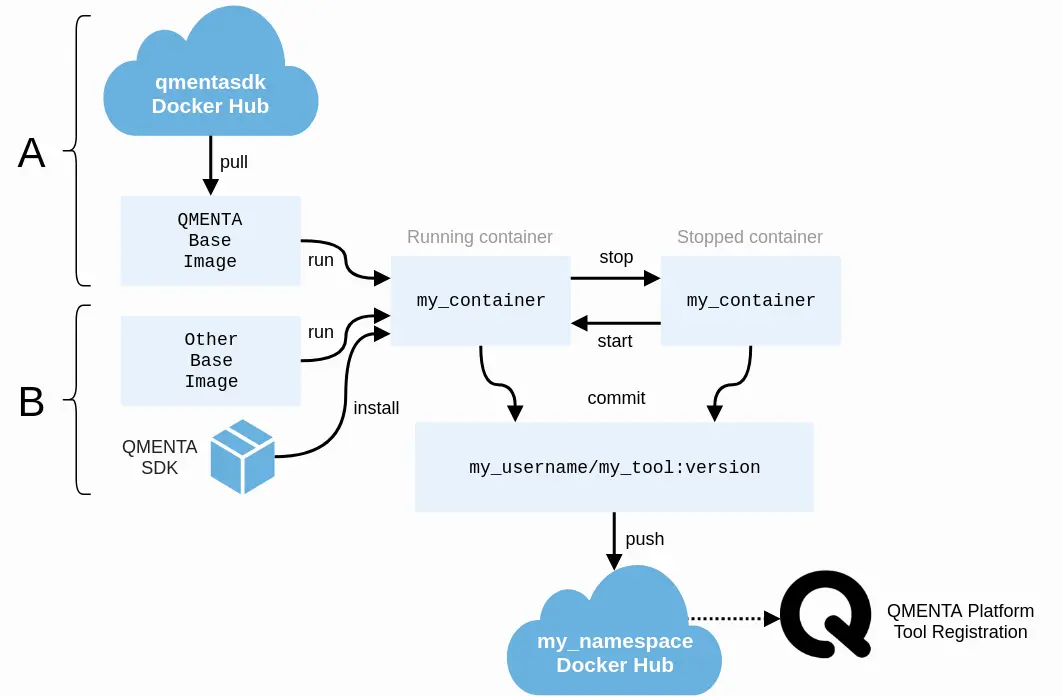
Workflow with (A) QMENTA base images or (B) the QMENTA SDK installer.
The notation for associating a local Docker image with a repository on a registry is:
username/repository:tag
However, for clarity reasons, this documentation uses the following syntax to name images:
username/tool_name:version
Note
The tag is optional, but we recommended using it to keep track of your different image versions.
Committing containers
When an image is launched, a live copy of the image (called container) is created. You can install anything you need to run your programs on them, and then save their state into new images.
Launch a container with an interactive terminal from an image by running:
docker run -ti --name=container_name qmentasdk/image_name:version /bin/bash
Edit the contents of the container.
You can copy files from the host computer to the container or install any program you need using a shell running inside the container. See Tool development with the SDK to see how to develop the analysis code inside the container.
docker cp file.txt container_name:/root/file.txt
Additionally, you can use mounted directories to copy/edit files in the container from the host computer. However, bear in mind that mounted directories are not saved when a container is committed.
Commit (save) the changes to a new image with a version tag:
docker commit container_name your_namespace/my_image_name:v1.0
Push the image to your registry.
If you do not have a docker registry, we recommend using DockerHub since it is integrated with Docker.
Hint
Docker Hub allow users to have 1 free private image, and an unlimited number of public images.
docker login  # Requires you to authenticate to Docker Hub
docker push your_namespace/image_name:version
Using a Dockerfile
Dockerfiles are the instructions of how to build an image. They allow developers to automate the creation of images with a fairly simple syntax.
Write a Dockerfile. For instance:
# Start from the following base image
FROM qmentasdk/image_name:version

# Copy some files inside the container
ADD /host_path/ /root/container_path

# Execute some commands
RUN pip install program_A
Warning
Every command on a Dockerfile (RUN, COPY and ADD) is translated into one extra layer in an image. Because of this, you may want to minimize the amount of commands that are executed.
For more information, see the Docker documentation and best practices for writing Dockerfiles.
Go to the directory with the Dockerfile and build the new Docker image:
docker build -t your_namespace/my_image_name:v1.0 .
Push the image to your registry. Again, if you do not have a docker registry, we recommend using DockerHub since it is seamlessly integrated with Docker.
docker login  # Requires you to authenticate to Docker Hub
docker push your_namespace/image_name:version