Parameters and Input Files
Tools can be customized to launch only with some specific data as input. They can also have parameters that will be seen in the form of check-boxes, number fields or drop-down menus. Users can interact with this form when starting a new analysis.
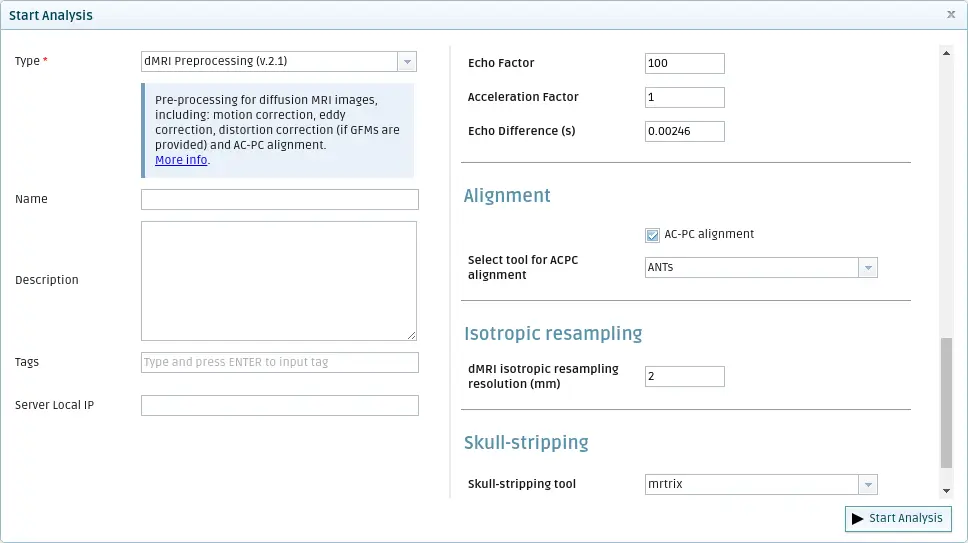
All these features can be configured through the platform, using a built-in text Editor in the Settings tab after selecting a tool in Analysis/My Tools menu. The configuration document consists of a list of settings (dictionaries, in JSON format), which follow the syntax explained below:

Handling the Input Files
By default, the settings configuration of a tool includes a generic input container specification that allows any kind of data to be selected as the input for a tool. In this context, an input container is just a group of files in a specific structure. The most typical examples of input containers are a patient’s data for a single session or the result of an analysis.
{
    "type":"container",
    "title": "Input Data",
    "id": "input",
    "mandatory": 1,
    "batch": 1,
    "file_filter": "c_files[1,*]<'',[],'\\.*'>",
    "in_filter": ["mri_brain_data"],
    "out_filter": [],
    "anchor": 1
}
- Input container specification fields:
type:
"container"Always “container” for input containers.title:
StringThe name of the input container to display.id:
StringA unique identifier that allows a tool to access its input files (see Tool development with the SDK to learn more).mandatory:
0 or 1indicates whether the user must provide data for this input container mandatorily.batch:
0 or 1allows the tool can to be launched in parallel for multiple sessions or analysis results. That is, perform a batch execution.file_filter:
See belowFilters the cardinality, modality and tags of the input files.in_filter:
List[String]the type of session data that can be used as input. As the moment now, this can only be mri_brain_data (a subject session).out_filter:
List[String]a list of tools identifiers to use their results as input data (e.g. qmenta_acpc_alignment).anchor:
0 or 1This setting tells the platform which data-set should identify the analysis (i.e. the analysis belongs to the timepoint of the input data).
Note
You can define multiple input containers with different requirements to better handle the inputs of the tools. This can extend to cases where you want to create a tool that takes the results of two analyses as inputs.
File Filter Examples
By specifying file filters, tools can provide usage information to the user regarding the expected type of file(s) that it needs to start the processing. This can include, for instance, the modality of the image or some required tags. File filters are also useful when we want the user to select different types of files within one input container.
"file_filter": "c_name[min, max]<'modality', mode [tag_1, tag_2,...], 'reg exp'>"
Where min and max limit the number of files allowed in this input container, or * for an undefinite number of files (e.g. [1, *]). Modality, tags and a matching regular expression are optional arguments that can be used when necessary. For the list of tags, the speficiation can optionally include the word “any” to denote that only one of the given tags is required, or “all” (default) when all the speficied tags are required.
One file with a modality
The following file filter definition will allow the user to select from 1 to N files with the modality T1.
"file_filter": "c_my_selection<'T1'>"
Note that we always add “c_” to the name of the conditions to make it easier to tell them apart from the modalities, tags or regular expressions.
Multiple files with different modalities and cardinalities
If we have a session of a patient with the following files:
MPRAGE.nii.gz: with modalityT1.
COR_2d.nii.gz: with modalityT1.
FLAIR.nii.gz: with modalityT2.
sphere.nii.gz: with modalityT2.
And we want to define a tool that takes either one T1 and one T2 or two T1 and one T2 images, we can define a file filter with two conditions which will force the user to pick the appropiate files when starting a new analysis:
Note
You can use the boolean operators AND and OR to define arbitrarily complex conditions. Remember to wrap any condition with parentheses to avoid any ambiguity.
"file_filter": "(c_A[1,2]<'T1'> AND c_B[1,1]<'T2'>)"
Using regular expressions
We can use regular expressions to define any pattern that we want to match with the names of the files in the input container. For example, in this case we want to select all files that start with the string “example_”.
"file_filter": "c_my_selection<'', any ['scalar', 'mask'], '^example_*'>"
Parameters
When you add a form for a custom parameter, their value can be obtained in the tools by calling the get_settings function as shown below:
def run(context):
    # ...
    settings = context.get_settings()
    param = settings['param_id']
    # ...
String parameter
Code
{
    "type": "string",
    "title": "Example String",
    "id": "ex_string",
    "mandatory": 1,
    "default": ""
}
Result

Integer parameter
Code
{
    "type": "integer",
    "title": "Example Integer",
    "id":"ex_integer",
    "mandatory":1,
    "default":12,
    "min":1,
    "max":100
}
Result

Decimal parameter
Code
{
     "type": "decimal",
     "title": "Example Decimal",
     "id":"ex_decimal",
     "mandatory":1,
     "default":12.36,
     "min":1.50,
     "max":100.50
 }
Result

Single choice parameter
Code
{
    "type": "single_choice",
    "title": "Example Single Choice",
    "id":"ex_single",
    "mandatory":1,
    "default":"a",
    "options":[["a", "A"], ["b", "B"], ["c", "C"]]
}
Result

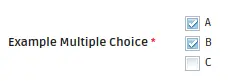
Multiple choice parameter
Code
{
    "type": "multiple_choice",
    "title": "Example Multiple Choice",
    "id":"ex_multi",
    "mandatory":1,
    "default":["a", "b"],
    "options":[["a", "A"], ["b", "B"], ["c", "C"]]
}
Result
Checkbox parameter
Code
{
    "type": "checkbox",
    "title": "Example Checkbox",
    "id":"ex_checkbox",
    "mandatory":1,
    "default":1
}
Result

Adding text and separators
The visual elements that follow are nothing but a visual components used by the platform to enrich the settings presentation.
Heading text
Code
{
    "type": "heading",
    "content": "Heading text goes here."
}
Result

Info text
Code
{
    "type": "info",
    "content": "Add your text here."
}
Result

Indented text
Code
{
    "type": "indent",
    "content": "Indent text goes here."
}
Result

Line
Code
{
    "type": "line",
}
Result
